

▷
A distance traveled of max. 1.25 miles/2 km
has not been exceeded.
▷
If the vehicle has not moved again for at
least two hours after a trip.
In the tire pressure table
To check the tire pressure using the tire pres-
sure specifications in the tire pressure table,
proceed as follows:
1.
Determine the nominal tire pressure for the
vehicle’s tires by referring to the informa-
tion on the driver’s door pillar.
2.
Check the tire pressure in all four tires, e.g.,
using a pressure gage.
3.
Correct the tire pressure if the current tire
pressure deviates from the target tire pres-
sure.
4.
Make sure that all valve caps are screwed
onto the tire valves.
The tire pressure specifications in the tire pres-
sure table correspond only to cold tires or to
tires at the same temperature as the ambient
temperature.
If vehicle
is equipped with an emergency
wheel: Check the tire pressure of the emer-
gency wheel in the cargo area regularly and
correct as necessary.
On the control display
To check the tire pressure using the tire pres-
sure information on the control display, pro-
ceed as follows:
1.
Go through the menu as follows: Apps
menu / "Vehicle" / "Vehicle status" / "Tire
Pressure Monitor".
2.
Check whether the current tire inflation
pressure levels deviate from the intended
tire pressure value.
3.
Correct the tire pressure if the current tire
pressure deviates from the target tire pres-
sure.
The display of current tire pressure on the con-
trol display may be restricted when the vehicle
is stationary. The tire pressure will update after
a short drive.
After correcting the tire pressure
If your vehicle is equipped with a Tire Pressure
Monitor, the corrected tire pressures are ap-
plied automatically. Make sure that the tire set-
tings are correct. When using tires not found in
the tire inflation pressure specifications on the
control display, reset the Tire Pressure Moni-
tor.
If your vehicle is
equipped with the flat tire
monitor, reinitialize it.
Tire inflation pressures up to 100 mph/160 km/h
For speeds of up to 100 mph/160 km/h and for
optimum driving comfort, follow the tire infla-
tion pressure specifications in the tire pressure
table and adjust as necessary.
The tire inflation pressure specifications can
also be found on the tire pressure label on the
driver's door pillar.
Do not exceed a speed of 100 mph/160 km/h.
Wheels and tires
Mobility
337
Online Edition

Tire size
Front wheel
Tire
pressure specifi-
cations in bar/PSI
Rear wheel
Tire
pressure specifi-
cations in bar/PSI
HL 195/55 R 19 97 H XL M+S
2.8 / 41
2.8 / 41
245/35 R 21 96 Y XL
2.8 / 41
2.9 / 42
Tire pressures over 100 mph/160 km/h
WARNING
When driving at speeds greater than
100 mph/160 km/h, incorrect tire pressures
can negatively affect vehicle handling, e.g.,
safety or comfort while driving. The tires can
become damaged, which may cause an ac-
cident. There is a risk of accident, injury,
and property damage. To drive at maximum
speeds, note the specified tire pressure for
driving above 100 mph/160 km/h in the tire
inflation pressure table, and adjust as neces-
sary.
Tire pressure values over 100 mph/160 km/h
X1 xDrive28i
The tire inflation pressure specifications in the
tire pressure table correspond to cold tires and
full load.
Tire size
Front wheel
Tire
pressure specifi-
cations in bar/PSI
Rear wheel
Tire
pressure specifi-
cations in bar/PSI
245/45 R 19 102 H XL
A/S
245/45 R 19 102 Y XL
245/45 R 19 102 H XL M+S
2.5 / 36
2.5 / 36
225/55 R 18 102 H XL
A/S
225/55 R 18 102 H XL M+S
2.5 / 36
2.5 / 36
205/65 R 17 100 H XL M+S
2.7 / 39
2.7 / 39
245/40 R 20 99 Y
XL
205/60 R 18 99 H XL M+S
2.8 / 41
2.8 / 41
245/40 R 20 99 V XL M+S
3.2 / 46
3.2 / 46
245/35 R 21 96 Y XL
HL
195/55 R 19 97 H XL M+S
3.2 / 46
3.2 / 46
Emergency wheel:
T
135/80 R 17 103 M
Speed up to a max. of
50 mph / 80 km/h
4.2 / 60
Wheels and tires
Mobility
339
Online Edition

Tire age
Recommendation
Regardless of the tire tread depth, replace tires
at least every 6 years.
Production date
The tire's production date is found on the tire
sidewall.
Designation
Production date
DOT … 1925
19th week of 2025
Uniform Tire Quality Grading
Quality grades can be found where applicable
on the tire sidewall between tread shoulder
and maximum section
width.
For example: Treadwear 200; Traction AA;
Temperature A
DOT Quality Grades
Treadwear
Traction AA A
B C
Temperature A B C
All passenger car tires must conform to Fed-
eral Safety Requirements in addition to these
grades.
Treadwear
The treadwear grade is a comparative rat-
ing based on the wear rate of the tire when
tested under controlled conditions on a speci-
fied government test course. For example, a
tire graded 150 would wear one and one-half,
1 g, times as well on the government course
as a tire graded 100. The relative performance
of tires depends upon the actual conditions
of their use, however, and may depart signifi-
cantly from the norm due to variations in driv-
ing habits, service practices and differences in
road characteristics and climate.
Traction
The traction grades, from highest to lowest,
are AA, A, B, and
C.
Those grades represent the tire's ability to
stop on wet pavement as measured under
controlled conditions on specified government
test surfaces of asphalt and concrete. A tire
marked C may have poor traction perform-
ance.
The traction
grade assigned to this tire is
based on straight-ahead braking traction tests,
and does not include acceleration, cornering,
hydroplaning, or peak traction characteristics.
Temperature
The temperature grades are A, the highest, B,
and C, representing the tire's resistance to the
generation of heat and its ability to dissipate
heat when tested under controlled conditions
on a specified indoor laboratory test wheel.
Sustained high temperature can cause the
material of the tire to degenerate and reduce
tire life, and excessive temperature can lead to
sudden tire failure. The grade C corresponds
to a level of performance which all passenger
car tires must meet under the Federal Motor
Vehicle Safety Standard No. 109. Grades Band
A represent higher levels of performance on
the laboratory test wheel than the minimum
required by law.
WARNING
The temperature grade for this tire is estab-
lished for a tire that is properly inflated and
not overloaded. Excessive speed, underinfla-
tion, or excessive loading, either separately
or in combination, can cause heat buildup
and possible tire failure. There is a risk of
accident, injury and a risk of damage to prop-
erty.
Wheels and tires
Mobility
341
Online Edition

Safety information
WARNING
Damaged tires can lose tire pressure, which
can lead to loss of vehicle control. There is
a risk of accident, injury, and property dam-
age. If tire damage is suspected while driving,
immediately reduce speed and stop. Have
wheels and tires checked. Drive carefully to
an authorized service center or another quali-
fied service center or repair shop. Have the
vehicle towed or transported as needed. Do
not repair damaged tires, but have them re-
placed.
WARNING
The wheels, tires and chassis components
can become damaged when driving over
curbs, road damage, or other obstacles.
Larger wheels have a smaller tire cross-sec-
tion. The smaller the tire cross-section, the
higher the risk of tire damage. There is a risk
of accident, injury, and property damage. If
possible, avoid driving over curbs, road dam-
age or other obstacles, or drive over them
slowly and carefully.
Exchanging wheels and
tires
Mounting and wheel balancing
Have the wheel mounted and balanced by an
authorized service center or another qualified
service center or repair shop.
Suitable wheels and tires
General information
Only certain wheel/tire combinations are suita-
ble, depending on vehicle and equipment. The
vehicle manufacturer determines wheel/tire
combinations based on the following criteria:
▷
Tire size, e.g., tire width, aspect ratio.
▷
Wheel size, e.g., rim diameter, offset.
For more information on wheel/tire combina-
tions and special equipment, contact an au-
thorized service center or another qualified
service center or repair shop.
Safety information
WARNING
Wheels and tires that are not suitable for
the vehicle can damage parts of the vehicle.
There is a risk of accident, injury, and prop-
erty damage. The vehicle manufacturer rec-
ommends that you use only wheels and tires
that have been recommended for the vehicle
type.
Warning
Wheel/tire combinations that are not suitable
for the vehicle can affect vehicle handling
and a number of system functions, e.g.,the
Antilock Braking System or Dynamic Stability
Control. There is a risk of accident, injury,
and property damage. The manufacturer of
the vehicle recommends that you use wheels
and tires that have been recommended by
the vehicle manufacturer for the vehicle type.
Following tire damage, have the original
wheel/tire combination remounted on the ve-
hicle as soon as possible.
Wheels and tires
Mobility
343
Online Edition

Changing run-flat tires
When changing from run-flat tires to standard
tires, it must be ensured that the vehicle con-
tains an emergency wheel or tire mobility kit.
For more information, contact an authorized
service center or another qualified service cen-
ter or repair shop.
Wheel change between axles
Different tread wear patterns can occur on the
front and rear axles depending on individual
driving conditions. The tires can be rotated in
pairs between the axles to achieve even abra-
sion. For more information, contact an author-
ized service center or another qualified service
center or repair shop. After changing a wheel,
check the tire pressure and correct as neces-
sary.
Storing tires
When storing tires, do not exceed the maxi-
mum tire pressure specified on the tire side-
wall.
When storing
tires, note the following:
▷
Store wheels and tires in a cool, dry and
dark place.
▷
Protect tires from coming into contact with
oil, grease, and solvents.
▷
Do not leave the tires in plastic bags.
▷
Remove dirt from wheels or tires.
Runflat tires
Principle
Runflat tires permit continued driving under
limited conditions even in the event of a com-
plete tire pressure loss.
General information
The wheels consist of tires that are self-sup-
porting to a limited degree and may also in-
clude special rims.
The reinforced tire sidewall makes it possible
to continue driving to a limited extent if a tire
loses pressure.
Follow
the instructions for continuing to drive
with a flat tire.
Safety information
WARNING
The vehicle handles differently when a runflat
tire has insufficient or no tire pressure; for
instance, reduced directional stability when
braking, braking distances are longer and the
self-steering properties will change. There is
a risk of accident, injury, and property dam-
age. Drive moderately and do not exceed a
speed of 50 mph/80 km/h.
WARNING
Heavy trailers can start swinging when con-
tinuing to drive with a flat tire. There is a
risk of accident, injury, and property damage.
Do not exceed a speed of 35 mph/60 km/h
when driving with a trailer and a flat tire. If the
trailer swings, brake immediately and apply
necessary steering corrections as carefully as
possible.
WARNING
Vibrations or loud noises while driving can
indicate the final failure of a tire. Tire compo-
nents may come loose. There is a risk of ac-
cident, injury, and property damage. Reduce
your speed and stop. Do not continue driving.
Contact an authorized service center or an-
other qualified service center or repair shop.
Wheels and tires
Mobility
345
Online Edition

Tire Pressure Monitor
Principle
The Tire Pressure Monitor monitors the tire
pressure and issues a warning if the tire pres-
sure has dropped.
The
sensors in the tire valves measure the tire
pressure and tire
temperature.
Depending on the tires detected or registered,
the system displays the specified nominal
pressures on the control display and compares
them with the current tire pressures.
General information
When using tires not found in the tire inflation
pressure specifications on the vehicle, such as
tires with special approval, the Tire Pressure
Monitor must be actively reset. The system will
then take over the current tire pressures as the
target pressures.
When
operating the system, also note the in-
formation found in the Tire inflation pressure
chapter.
Additional
information:
Tire inflation pressure, refer to page
Safety information
WARNING
The display of the target pressures is not
a substitute for the tire inflation pressure de-
tails on the vehicle. Incorrect entries in the
tire settings can lead to incorrect target tire
inflation pressure values. In this case, it can-
not be guaranteed that the notification of a
tire pressure loss will be reliable. There is a
risk of injury and risk of property damage.
Make sure that the sizes of your mounted
tires are displayed correctly and match the
information on the tires and the tire inflation
pressure specifications on the vehicle.
Functional requirements
To use the Tire Pressure Monitor, the following
functional requirements must be met:
▷
After each tire or wheel change, the system
detects and updates the mounted tires on
the control display and displays them after
a short trip.
▷
The Tire Pressure Monitor does not acti-
vate until after driving for a few minutes:
▷
After a tire or wheel change.
▷
After a reset, when using tires with spe-
cial approval.
▷
After changing tire settings.
▷
In the case of tires with special approval, a
reset was performed after a tire or wheel
change or after adjusting the tire pressure.
▷
Wheels with tire pressure sensors are
mounted.
Tire settings
General information
You can enter information on your mounted
tires in the tire settings if the tires are not auto-
matically detected by the
system.
The tire sizes of the mounted tires can be
gathered from the tire inflation pressure details
on the vehicle or directly
on the tires.
The tire details do not need to be re-entered
when the tire pressure is
corrected.
For summer and winter tires, the tire details
entered last are stored. After a tire or wheel
change, the settings of the tire sets used last
can be selected.
Configuring the tire settings
1.
To enter information on the tires mounted
in the tire settings, go through the menu as
follows: Apps menu / "Vehicle" / "Vehicle
status" / "Tire Pressure Monitor" / "Tire
Wheels and tires
Mobility
347
Online Edition
▷
The system may not be operational.
▷
After confirming the tire settings, the tire
pressure is measured automatically.
▷
When using tires with special approval: the
system is being reset.
For tires with special approval: per-
forming a reset
1.
To reset tires with special approval, go
through the menu as follows: Apps menu /
"Vehicle" / "Vehicle status" / "Tire Pressure
Monitor".
2.
Make sure that the tire settings are correct.
3.
Turn on drive-ready state but do not drive
off.
4.
"Perform reset"
5.
Drive off.
The wheels are shown in gray and the tire
pressure is reset.
After
a travel time of several minutes, the set
tire inflation pressures are accepted as the
predefined tire inflation pressures. The reset is
completed automatically while
driving.
Once the reset is complete, the wheels on the
control display are shown in green. A message
is displayed.
You may
interrupt this trip at any time. When
you continue driving the reset resumes auto-
matically.
Additional
information:
Tire settings, refer to page
.
Messages: for tires without special
approval
General information
When a flat tire is indicated, the Dynamic Sta-
bility Control may be turned on.
Safety information
WARNING
A damaged regular tire with low or no tire
inflation pressure impacts handling such as
steering and braking response. Runflat tires
can maintain limited stability. There is a risk
of accident, injury, and property damage. Do
not continue driving if the vehicle is equipped
with normal tires. Follow the information on
runflat tires and continued driving with these
tires.
If a tire inflation pressure check is re-
quired
Message
If it is necessary to check the tire pressure, a
message appears.
An
icon with a Check Control message appears
on the control display.
Icon
Possible cause
Leak detected on the
tire.
Inflation was not carried out accord-
ing to specifications, for instance
when the tire has not been suffi-
ciently inflated or in the case of a nat-
ural steady tire pressure loss.
Measure
Check the tire pressure and correct as needed.
If the tire inflation pressure is too low
Message
If the tire pressure is too low, a message ap-
pears.
A yellow warning light is illuminated in
the instrument cluster.
Wheels and tires
Mobility
349
Online Edition
Icon
Possible cause
Inflation was not carried out ac-
cording to specifications, e.g., the
tire has not been sufficiently in-
flated.
The system has
detected a wheel
change, but no reset was
done.
The tire inflation pressure has
fallen below the level of the last
reset.
No reset was
performed for the
system. The system issues a
warning based on the tire inflation
pressures stored during the last re-
set.
Measure
1.
Check the tire pressure and correct as
needed.
2.
Perform a system reset.
If the tire inflation pressure is too low
Message
If the tire pressure is too low, a message ap-
pears.
A yellow warning light is illuminated in
the instrument cluster.
In addition, an icon with a Check Control mes-
sage appears on the control display.
Icon
Possible cause
There is a tire pressure
loss.
No reset was performed for the sys-
tem. The system issues a warning
based on the tire inflation pressures
stored during the last reset.
Measure
1.
Reduce the vehicle speed. Do not continue
to exceed a speed of 80 mph/130 km/h.
2.
At the next opportunity, for instance at a fill-
ing station, check the tire inflation pressure
in all four tires and correct if necessary.
3.
Perform a system reset.
If there is a significant tire pressure
loss
Message
If the tire pressure drops significantly, a mes-
sage appears.
A yellow warning light is illuminated in
the instrument cluster.
In addition, an icon with the affected tire ap-
pears in a Check Control message on the con-
trol display.
Icon
Possible cause
There is a flat tire or a major tire
pressure loss.
No reset
was performed for the sys-
tem. The system issues a warning
based on the tire inflation pressures
stored during the last reset.
Measure
1.
Reduce your speed and come to a stop
carefully. Avoid sudden braking and steer-
ing maneuvers.
2.
Check whether the vehicle is fitted with
standard tires or run-flat
tires.
Run-flat tires are indicated by a circular
icon containing the letters “RSC” on the tire
sidewall.
3.
Follow the instructions for what to do in
case of a flat tire.
Additional information:
Wheels and tires
Mobility
351
Online Edition

If the vehicle is loaded with an average
weight and used under favorable conditions,
the possible distance traveled may be up to
50 miles/80 km.
Vehicle handling with damaged tires
Vehicles driven with a damaged tire will han-
dle differently, potentially leading to conditions
such as the following:
▷
Greater likelihood of skidding of the vehicle.
▷
Longer braking distances.
▷
Changed self-steering properties.
Modify your driving style. Avoid abrupt steering
or driving over obstacles, for instance curbs or
potholes.
System limits
Temperature
The tire pressure depends on the tire's tem-
perature.
Driving or
exposure to the sun will increase the
tire temperature, thus increasing the tire infla-
tion pressure.
The tire
inflation pressure is reduced when the
tire temperature falls
again.
These circumstances may cause a warning
when temperatures fall very
sharply.
Following a temperature-related warning, the
target pressures are displayed on the control
display again after a short distance.
Sudden tire pressure loss
The system is not able to indicate sudden and
serious tire damage and the resulting loss of
tire pressure caused by external circumstan-
ces.
Failure performing a reset
For tires with special approval, this system will
not function correctly if it has not been reset.
For example, a flat tire is being reported de-
spite the tires having the correct pressure.
Malfunction
Message
The Tire Pressure Monitor displays a message
if the system is not operational.
The yellow warning light flashes and is
then illuminated continuously. A Check
Control message is displayed. It may
not be possible to identify tire pressure losses.
Measure
If the Tire Pressure Monitor system is not op-
erational, proceed as follows:
▷
If a wheel without air pressure sensor is
mounted, have the wheels checked as nec-
essary.
▷
Fault due to systems or devices with same
transmission frequency: The system reacti-
vates automatically upon leaving the inter-
ference zone.
▷
The system was unable to completely reset
when using tires with special approval. Per-
form a system reset again.
▷
If the Tire Pressure Monitor has failed:
Have the vehicle checked by an authorized
service center or another qualified service
center or repair shop.
Declaration according to
NHTSA/FMVSS 138 Tire Pressure
Monitoring System
Each tire, including the spare (if provided)
should be checked monthly when cold and in-
flated to the inflation pressure recommended
by the vehicle manufacturer on the vehicle
placard or tire inflation pressure label. (If your
vehicle has tires of a different size than the
size indicated on the vehicle placard or tire
inflation pressure label, you should determine
the proper tire inflation pressure for those
tires.) As an added safety feature, your vehi-
cle has been equipped with a tire pressure
monitoring system (TPMS) that illuminates a
Wheels and tires
Mobility
353
Online Edition
"Vehicle" / "Vehicle status" / "Flat tire
monitor".
2.
Switch on drive-ready state.
3.
"Perform reset"
4.
Drive off.
The initialization is completed while driving,
which can be interrupted at
any time.
The initialization automatically continues when
driving continues.
Messages
Safety information
WARNING
A damaged regular tire with low or no tire
inflation pressure impacts handling such as
steering and braking response. Runflat tires
can maintain limited stability. There is a risk
of accident, injury, and property damage. Do
not continue driving if the vehicle is equipped
with normal tires. Follow the information on
runflat tires and continued driving with these
tires.
Indication of a flat tire
A message appears if there is
a flat tire.
When a flat tire is indicated, the Dynamic Sta-
bility Control (DSC) is turned on, if needed.
A yellow warning light is illuminated in
the instrument cluster.
In addition, an icon with a Check Control mes-
sage appears on the control display.
Icon
Possible cause
There is a flat tire or a major tire
pressure loss.
Measure
1.
Reduce your speed and come to a stop
carefully. Avoid sudden braking and steer-
ing maneuvers.
2.
Check whether the vehicle is fitted with
standard tires or run-flat
tires.
Run-flat tires are indicated by a circular
icon containing the letters “RSC” on the tire
sidewall.
3.
Follow the instructions for what to do in
case of a flat tire.
Actions in the event of a flat tire
Standard tires
1.
In the event of a flat tire, identify the dam-
aged tire.
2.
Check the tire pressure in all four tires,
for instance using the tire pressure display
of a flat tire
kit.
When the tire inflation pressure in all four
tires is correct, the flat tire monitor may not
have been initialized.
Initialize the system.
If no tire damage can be identified, con-
tact an authorized service center or another
qualified service center or repair shop.
3.
Repair the flat tire, e.g., using a tire repair
set or by changing the wheel.
Runflat tires
Safety information
WARNING
The vehicle handles differently when a runflat
tire has insufficient or no tire pressure; for
instance, reduced directional stability when
braking, braking distances are longer and the
self-steering properties will change. There is
a risk of accident, injury, and property dam-
age. Drive moderately and do not exceed a
speed of 50 mph/80 km/h.
Wheels and tires
Mobility
355
Online Edition

▷
Park the vehicle on solid and non-slip
ground at a safe distance from road traffic.
▷
Switch on the hazard warning lights.
▷
Engage the parking brake.
▷
Turn the steering wheel until the front
wheels are in the straight-ahead position
and engage the steering wheel lock.
▷
As soon as permitted by the traffic flow,
have all vehicle occupants get out and
make sure that they remain outside the
hazardous area such as behind a guardrail.
▷
If necessary, set up the hazard triangle
or hazard warning lights at a suitable dis-
tance.
Repair the flat tire, e.g., using a tire repair set
or by changing the wheel.
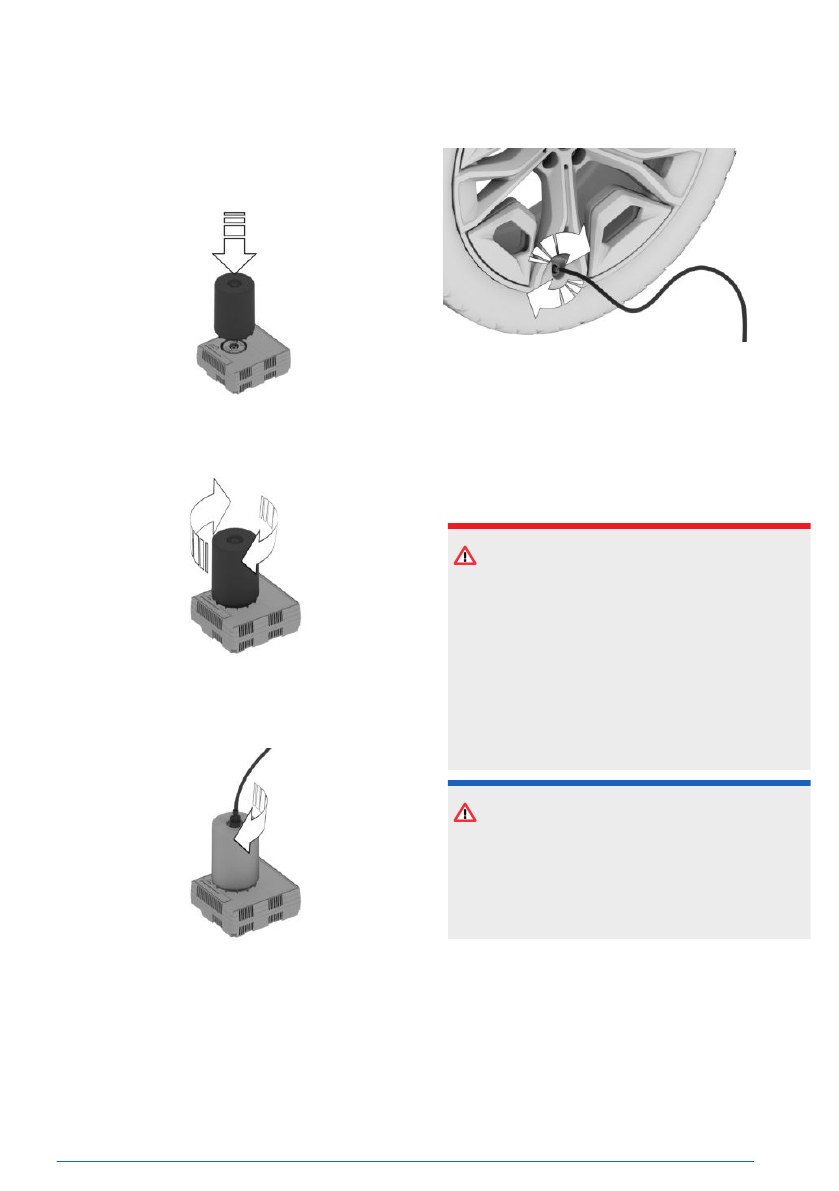
Tire repair set Plus
Principle
Minor tire damage can be temporarily sealed
using the tire repair set Plus. The battery-oper-
ated device is magnetically fitted to the wheel
center and pumps tire sealant and air into the
tires through a hose, both when stationary and
while driving.
The
filled in tire sealant closes the damage
from the inside when it
hardens.
The current tire pressure is shown on the con-
trol display in the
vehicle.
The tire repair set Plus is only designed to be
mounted once to the
wheel.
The tire repair set Plus may be ineffective if
the tire damage measures more than approx.
0.16 in/4 mm. Remove foreign objects from the
tire only when they are visibly protruding from
the tire.
Follow the
instructions for using the tire repair
set Plus on the housing.
Overview
1
Magnetic feet
2
Guide pins
3
Filler hose
4
Housing/compressor
5
Power switch
Storage
Depending on vehicle equipment, the tire re-
pair set Plus is stored as follows:
▷
In the cargo area under the cargo area
floor.
▷
In the cargo area on the left or right side.
▷
In the cargo area behind a side trim panel.
Safety precautions
When using the tire repair set Plus, take the
following safety precautions:
▷
Park the vehicle on solid and non-slip
ground at a safe distance from road traffic.
▷
Switch on the hazard warning lights.
▷
Engage the parking brake.
▷
Turn the steering wheel until the front
wheels are in the straight-ahead position
and engage the steering wheel lock.
▷
As soon as permitted by the traffic flow,
have all vehicle occupants get out and
make sure that they remain outside the
hazardous area such as behind a guardrail.
Wheels and tires
Mobility
357
Online Edition

▷
Flat tire monitor, refer to page
▷
Tire Pressure Monitor, refer to page
.
Operation when stationary
If it is not possible to attach the tire repair
set Plus to the wheel, e.g., with snow chains
attached, proceed as follows:
1.
Once the filler hose is connected to the tire
valve, turn on the tire
repair set Plus.
Hold the tire repair set Plus in your hand
during the inflation process.
2.
The tire repair set Plus turns off auto-
matically when the tire pressure reaches
2.0 bar/29 psi.
If the
tire pressure does not reach 2.0
bar/29 psi after 15 minutes, turn off the de-
vice. Contact an authorized service center
or another qualified service center or repair
shop.
3.
Turn off the tire repair set Plus and stow it
away.
4.
Screw the valve cap onto the valve.
5.
Drive off.
Drive
carefully and do not exceed a speed
of max. 50 mph/80 km/h.
6.
Once a drive is started, for approx. 15 mi-
nutes or 6 miles/10 km, observe whether
the tire pressure
drops.
Do not continue driving if the tire pressure
drops below 1.2 bar/18 psi. Contact an au-
thorized service center or another qualified
service center or repair shop.
Replace the faulty tire and the tire repair set
Plus.
Change the tires
within the next
125 miles/200 km.
Additional information:
▷
Flat tire monitor, refer to page
▷
Tire Pressure Monitor, refer to page
.
Charging the tire repair set Plus
The integrated battery of the tire repair set
Plus is subject to system-related self-discharg-
ing, even if the device is
not turned on.
The vehicle manufacturer recommends check-
ing the state of charge of the tire repair set
Plus regularly, or every
two years at least.
To check the state of charge, press the switch
next to the USB port on the
rear of the device.
The LED integrated into the switch illuminates
in the corresponding color:
Color Meaning
Green The tire repair set Plus is sufficiently
charged and can be used.
Red
The battery of the tire repair set Plus
has a low state of charge. It may not
be fully operational.
To charge the tire repair set Plus, connect the
device to a suitable power source via USB ca-
ble.
Malfunction
Using tire sealant can damage the tire pres-
sure sensor on the wheel. If the vehicle is
equipped with the Tire Pressure Monitor, have
the damaged tire pressure sensor replaced.
Tire repair set
Principle
The tire repair set is used to temporarily seal
minor tire damage so that it is possible to con-
tinue driving.
The
filled in tire sealant closes the damage
from the inside when it
hardens.
The compressor can be used to check the tire
inflation pressure.
Wheels and tires
Mobility
359
Online Edition
Preparing the tire repair set
1.
To prepare the tire repair set, place the
sealant bottle into the holder on the com-
pressor housing.
2.
Turn the sealant bottle clockwise by 90° to
the stop.
3.
Connect the filler hose to the outlet of the
sealant bottle and turn clockwise by 90° to
the stop.
4.
Unscrew the valve cap on the wheel.
5.
Screw the filler hose connector onto the tire
valve.
6.
With the compressor switched off, insert the
connector into the power socket in the vehi-
cle interior.
Sealant
Safety information
DANGER
If the exhaust pipe is blocked or ventilation is
insufficient, harmful exhaust gases can pene-
trate the vehicle. The exhaust gases contain
pollutants which are colorless and odorless.
In enclosed areas, exhaust gases can also
accumulate outside of the vehicle. There is a
danger to life. Keep the exhaust pipe free and
ensure sufficient ventilation.
NOTICE
The compressor can overheat during ex-
tended operation. There is a risk of property
damage. Do not run the compressor for more
than 10 minutes.
Filling the tire with sealing compound
1.
With standby state or drive-ready state
switched on, switch on the
compressor.
When adding sealant, the Tire Pressure
Monitor may briefly rise up to approx.
6 bar/87 psi before it shows the actual tire
Wheels and tires
Mobility
361
Online Edition

Removing and stowing the tire re-
pair set
To remove and stow the tire repair set, pro-
ceed as follows:
1.
Switch off the compressor.
2.
Pull the connector out of the socket in the
vehicle interior.
3.
Disconnect the hose from the compressor
and from the tire valve.
4.
Screw the valve cap onto the tire valve.
5.
Stow the tire repair set together with the
hose in the cargo area.
Continuing the trip
Continue driving immediately once finished
with the tire repair
set.
Do not exceed the speed limit of
50 mph/80 km/h.
Do not
exceed the maximum travel distance of
125 miles/200 km.
Re-initialize the flat tire monitor or reset the
Tire Pressure
Monitor.
Replace the faulty tire and the sealant bottle
from the tire repair set as
soon as possible.
Additional information:
▷
Flat tire monitor, refer to page
▷
Tire Pressure Monitor, refer to page
.
System limits
If the tires cannot be made ready to drive, con-
tact an authorized service center or another
qualified service center or
repair shop.
If your vehicle is equipped with a Tire Pressure
Monitor, note the following: using tire sealant
can damage the tire pressure sensor. If the tire
pressure sensor is damaged, have it replaced
at the next opportunity.
Emergency wheel
Principle
In the event of a flat tire, one emergency spare
wheel maximum can be used as a replace-
ment for defective tires. The emergency wheel
is only intended for temporary use until the
faulty tire/wheel has been replaced.
General information
Also check the tire pressure of the spare wheel
in the cargo area regularly, and correct as nec-
essary.
If the vehicle
is equipped with a Sport brake,
the emergency wheel can only be mounted on
the rear axle. If there is tire damage on the
front axle, the emergency wheel must first be
fitted on the rear axle on the same side of the
vehicle. The intact wheel of the rear axle can
then be mounted on the front axle.
Safety information
WARNING
The emergency wheel has particular dimen-
sions. When driving with an emergency
wheel, changed handling characteristics may
occur, for instance reduced directional stabil-
ity when braking, longer braking distance,
and changed roll steer in the stability limit.
There is a risk of accident, injury, and prop-
erty damage. Drive moderately and do not
exceed a speed of 50 mph/80 km/h.
WARNING
The vehicle can be damaged when the emer-
gency wheel is used for too long. There is a
risk of accident, injury, and property damage.
Drive moderately and do not exceed a driving
distance of 600 miles/1,000 km.
Wheels and tires
Mobility
363
Online Edition
WARNING
The jack is optimized for lifting the vehicle
and for the jacking points on the vehicle only.
There is a risk of injury. Do not lift any other
vehicle or cargo using the jack.
WARNING
When the jack is not inserted into the jacking
point provided for this purpose, the vehicle
may be damaged or the jack may slip when
it is being cranked up. There is a risk of injury
and risk of property damage. When cranking
up the jack, ensure that it is inserted in the
jacking point next to the wheel well.
WARNING
A vehicle that is raised on a jack may fall
off of the jack if lateral forces are exerted
on it. There is a risk of injury and risk of
property damage. While the vehicle is raised,
do not exert lateral effort on the vehicle or
pull abruptly on the vehicle. Have a stuck
wheel removed by an authorized service cen-
ter or another qualified service center or re-
pair shop.
NOTICE
Using an impact wrench to loosen or tighten
the wheel lock bolt can damage the wheel
lock bolt. There is a risk of property damage.
Only use a lug wrench to loosen and tighten
the lug bolt lock.
Securing the vehicle against rolling
away
General information
The vehicle manufacturer recommends secur-
ing the vehicle to prevent it from rolling away
when changing a wheel, in addition to engag-
ing the parking brake.
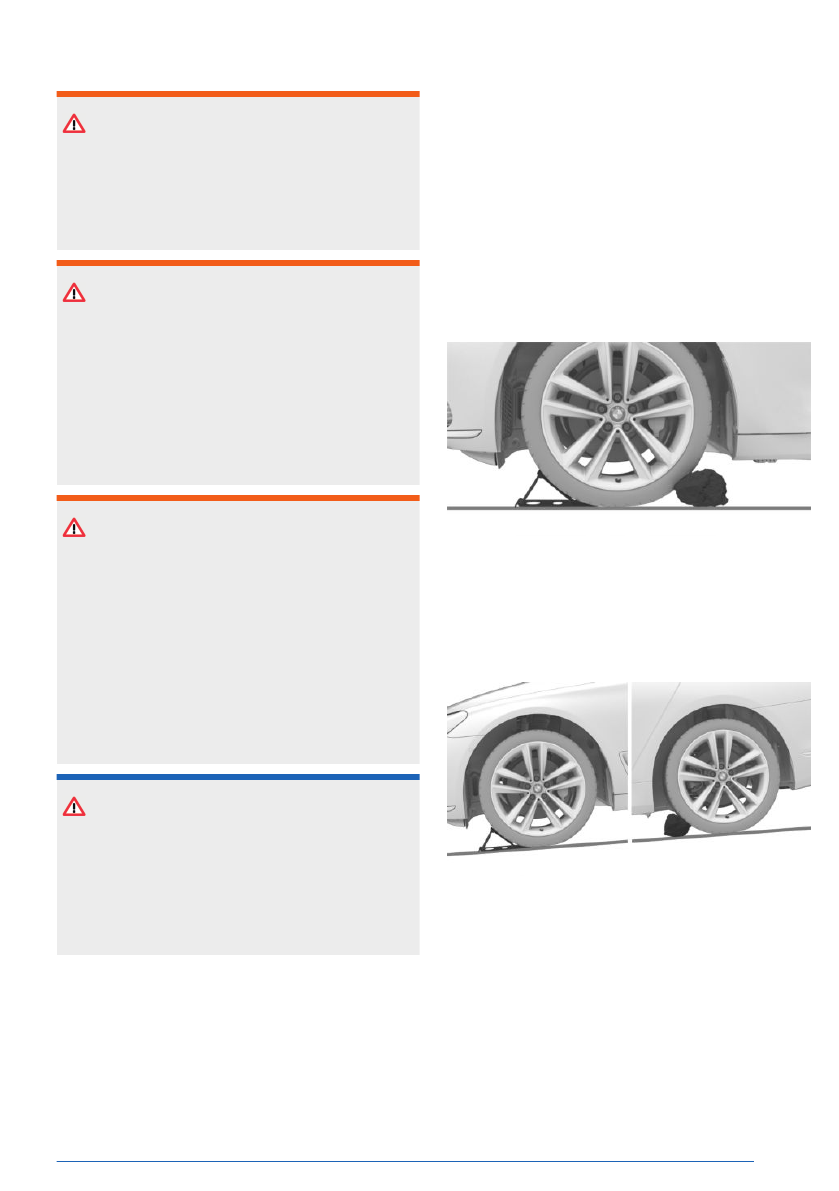
On a level surface
Place chocks or other suitable objects in front
and behind the wheel that is diagonal to the
wheel being changed.
On a slight downhill gradient
Place wheel chocks or other suitable objects,
e.g., rocks, under the wheels of the front axle
and rear axle, opposite the rolling direction.
Lug bolt lock
Principle
The wheel bolt lock offers effective protection
against wheel theft.
Wheels and tires
Mobility
365
Online Edition
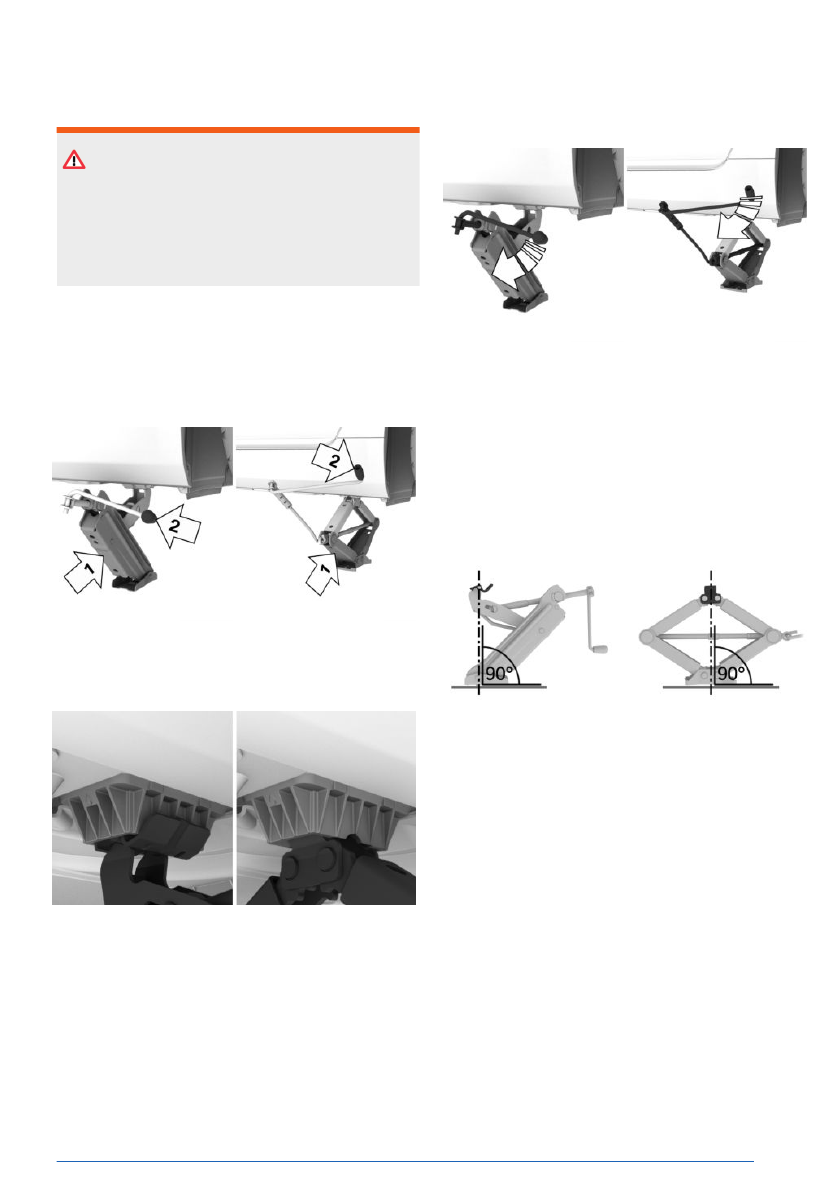
Jacking up the vehicle
WARNING
Hands and fingers can be jammed when us-
ing the jack. There is a risk of injury. Comply
with the described hand position and do not
change this position while using the jack.
To raise the vehicle so that you can change a
wheel, proceed as follows:
1.
Hold the jack with one hand, arrow 1. With
the other hand, grip the jack crank handle
or the lever, arrow 2.
2.
Insert the jack into the rectangular recess of
the jacking point closest to the wheel to be
changed.
3.
Extend the jack by turning the jack crank
handle or lever clockwise.
4.
Take your hand away from the jack as soon
as the jack is under load and continue turn-
ing the jack crank handle or lever with one
hand.
5.
Make sure that the jack foot is extended
vertically and that the jack's entire face is
on the ground.
6.
Extend the jack until the corresponding
wheel is raised max. 1.2 in / 3 cm from the
ground.
Mounting a wheel
Mount one emergency wheel
only, as required.
To change a wheel, proceed as follows:
1.
Unscrew the lug bolts.
2.
Remove the wheel.
3.
Put the new wheel or emergency wheel on
and screw in at least two lug bolts in a
crosswise pattern until
hand-tight.
When non-original light-alloy wheels of the
vehicle manufacturer are mounted, the ac-
Wheels and tires
Mobility
367
Online Edition
")


