
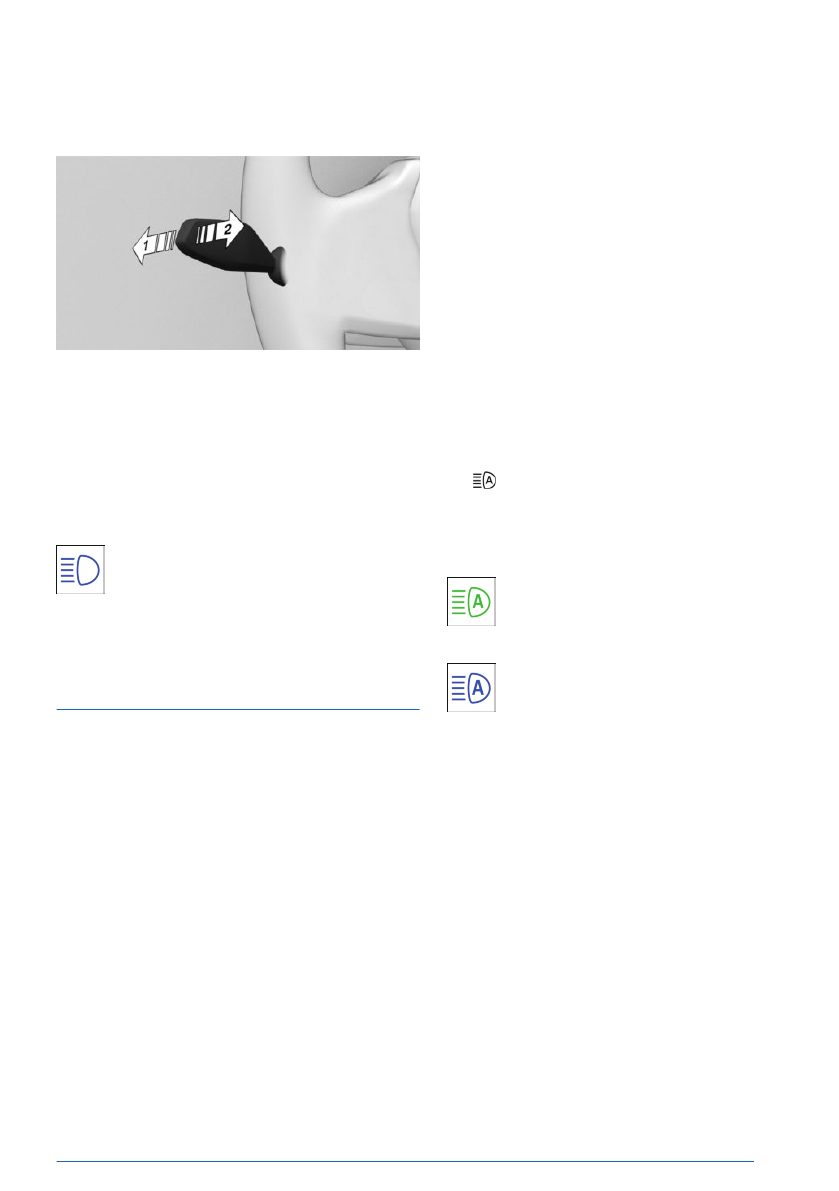
High-beam headlights, turning
headlight flasher on/off
To turn on the high-beam headlights, push
the turn signal lever forward, arrow 1. The
high-beam headlights illuminate when the low-
beam headlights are switched
on.
To turn off the high-beam headlights or oper-
ate the headlight flasher, pull the turn signal
lever backward, arrow 2.
The blue indicator light on the instru-
ment cluster illuminates when the high-
beam headlights are turned on or the
headlight flasher is activated.
High Beam Assistant
Principle
The High Beam Assistant promptly detects
other road users as well as the ambient light-
ing, e.g., in towns, and automatically switches
the high-beam headlights on or off depending
on the traffic
situation.
You may need to activate the High Beam As-
sistant via iDrive before it can be used. You
can use the turn signal lever to temporarily de-
activate or activate the High Beam Assistant,
e.g., after turning your high-beam headlights
on/off manually.
General information
In the low speed range, the high-beam head-
lights are not switched on by the High Beam
Assistant.
Functional requirements
To use the High Beam Assistant, the following
functional requirements must be met:
▷
The automatic lights function is activated.
▷
The low-beam headlights are turned on.
Activating High Beam Assistant
1.
To activate the High Beam Assistant, go
through the menu as follows: Apps menu /
"Vehicle" / "Exterior lighting" / "Headlights".
2.
Tap the High Beam Assistant button.
The headlights are automatically changed be-
tween low-beam headlights and high-beam
headlights.
The green indicator light on the instru-
ment cluster illuminates when the low-
beam headlights are turned on.
The blue indicator light in the instru-
ment cluster illuminates when the sys-
tem switches on the high-beam head-
lights.
If the Automatic High Beam Assistant is on
and you continue driving after an interruption,
the Automatic High Beam Assistant will re-
main on.
The Automatic
High Beam Assistant is deac-
tivated when the high-beam headlights are
switched on and off manually.
Light and view
Controls
157
Online Edition
System limits
The High Beam Assistant cannot replace the
driver's personal judgment of when to use the
high-beam headlights. Turn off the high-beam
headlights manually in situations that require a
personal decision.
The
system may not be fully operational in
the following situations, and driver intervention
may be necessary:
▷
In very unfavorable weather conditions
such as fog or heavy precipitation.
▷
When detecting poorly-lit road users such
as pedestrians, cyclists, horseback riders
and wagons; when driving close to train or
ship traffic; or at animal crossings.
▷
In tight curves, on hilltops or in depressions,
in crossing traffic or half-obscured oncom-
ing traffic on highways.
▷
In poorly-lit towns and cities or in the pres-
ence of highly reflective signs.
▷
When the windshield in the area in front
of the interior mirror is fogged up, dirty or
covered with stickers, etc.
Exterior lighting
Principle
The exterior lighting comprises all lighting ele-
ments on the outside of the vehicle. The exte-
rior lighting, or individual functions of it, can be
operated using the buttons in your vehicle, the
buttons on your vehicle key,
or via iDrive.
If the driver's door is opened when the drive-
ready state is switched off, the exterior lighting
is automatically switched off after a period of
time.
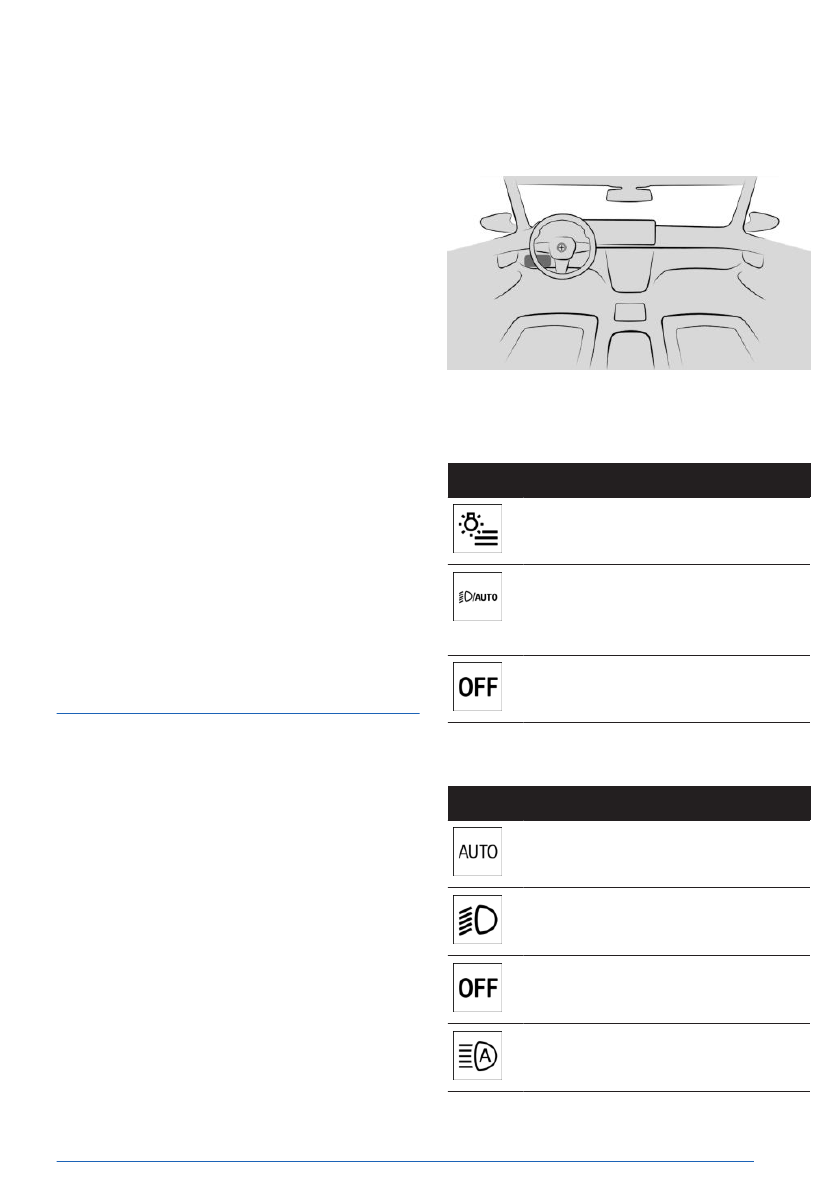
Overview
Buttons in the vehicle
The buttons for the exterior lighting are located
on the light switch between the steering wheel
and the driver's door.
Icon
Function
Exterior lighting menu.
Automatic headlight
control.
Low-beam headlights.
Exterior lighting off.
Exterior lighting off.
Functions via iDrive
Icon
Function
Automatic headlight control.
Low-beam headlights.
Exterior lighting off.
High Beam Assistant.
Light and view
Controls
159
Online Edition
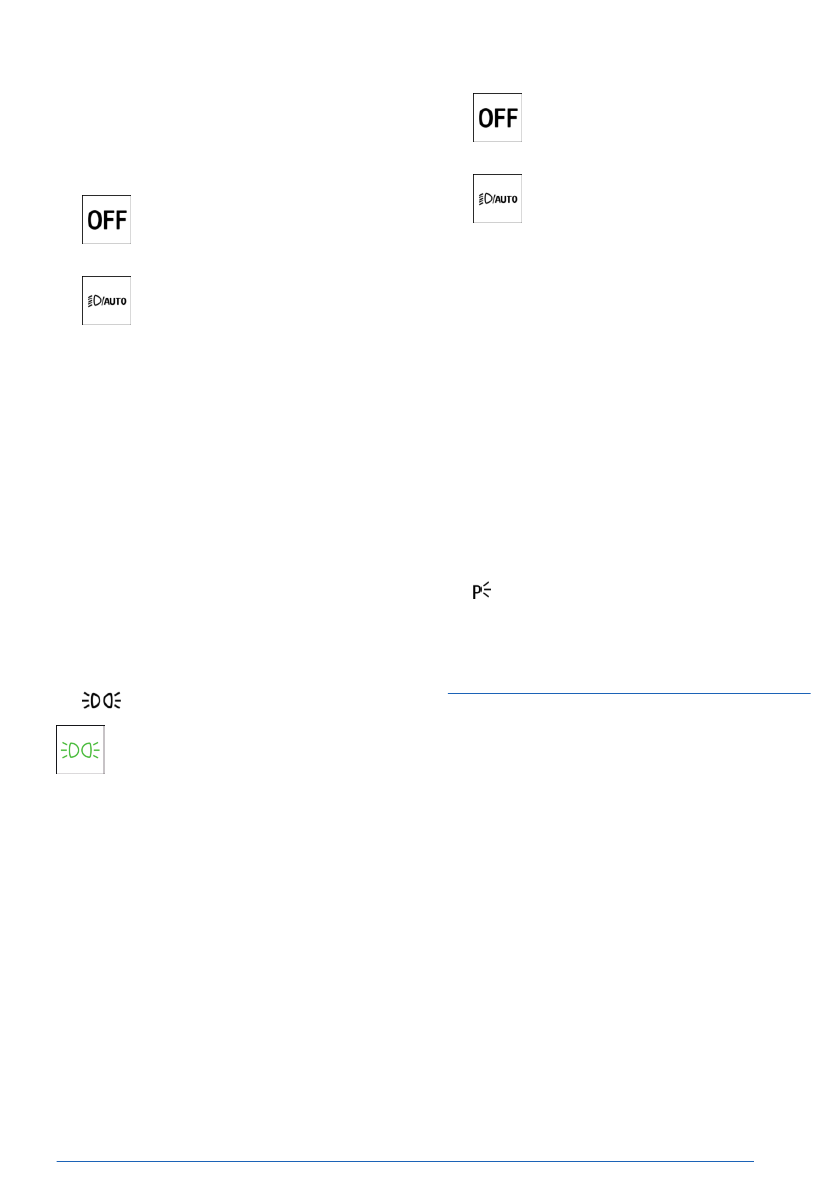
Turning off low-beam headlights
Depending on national-market version, the
low-beam headlights can be turned off as fol-
lows at low speeds:
▷
Press the OFF button on the light
switch.
▷
On the light switch, press and hold
the button for automatic headlights and
low-beam headlights.
▷
Turn off the light via iDrive.
Parking lights
General information
The parking lights can only be turned on at low
speeds.
Turning on parking lights
1.
To turn on the parking lights, go through
the menu as follows: Apps menu /
"Vehicle" / "Exterior lighting" / "Parking
lights".
2.
Tap the parking lights button.
The green indicator light on the instru-
ment cluster illuminates when the park-
ing lights are turned on.
The vehicle is illuminated on
all sides.
Do not use the parking lights for extended pe-
riods; otherwise, they might drain the vehicle
battery and it would then be impossible to
switch on drive-ready state.
Turning off parking lights
The following options are available to turn off
the parking lights:
▷
Press the OFF button on the light
switch.
▷
On the light switch, press and hold
the button for automatic headlights and
low-beam headlights.
▷
Turn off the light via iDrive.
▷
Switch on drive-ready
state.
When drive-ready state is turned on, the
automatic driving lights activate.
Roadside parking lights
When the vehicle is parked, a one-sided road-
side parking light can be switched on.
1.
To turn on the roadside parking light, go
through the menu as follows: Apps menu /
"Vehicle" / "Exterior lighting" / "Parking
lights".
2.
Tap the roadside parking light button for
the desired side of the vehicle.
Welcome lights
Principle
The welcome light turns on automatically for
a limited period of time when approaching or
unlocking the
vehicle.
Depending on the equipment, the exterior
lighting of the vehicle can be set individually.
Light and view
Controls
161
Online Edition

Adaptive lighting functions
Principle
The adaptive lighting functions provide dy-
namic illumination of the
road.
The adaptive lighting functions may consist of
one system or multiple systems, depending on
the equipment version:
▷
Cornering light.
Activating the adaptive lighting
functions
To activate adaptive lighting functions,
press the automatic lights button and
low-beam headlights button on the
light switch.
The LED in the button
illuminates.
The adaptive lighting functions are active
when the drive-ready state is switched on.
Cornering light
In tight curves, for instance on mountainous
roads or when turning, an additional cornering
light is switched on that illuminates the inside
of the curve when the vehicle is moving below
a certain speed.
The
cornering light is automatically switched
on depending on the steering-wheel angle or,
where applicable, the use of turn signals. When
driving in reverse, the cornering lights may be
automatically switched on regardless of the
steering-wheel angle.
Adaptive headlight range
control
The Adaptive Headlight Range Control com-
pensates for vehicle acceleration, braking, and
load conditions to prevent your headlights from
dazzling oncoming traffic.
Instrument lighting
Principle
The instrument lighting illuminates switches
and buttons with the individually set bright-
ness.
The brightness of
the instrument lighting can
only be adjusted in darkness and when the
parking lights or low-beam headlights are
turned on.
Setting the brightness
1.
To adjust the brightness of the instrument
lighting, go through the menu as follows:
Apps menu / "Vehicle" / "Interior lighting" /
"Cockpit brightness".
2.
Select the desired setting.
Interior lighting
Principle
The interior lighting comprises all lighting ele-
ments inside the
vehicle.
Depending on vehicle equipment, the following
is controlled automatically:
▷
Interior lights.
▷
Footwell lights.
▷
Entry lights.
▷
Ambient light.
▷
Speaker lighting.
Light and view
Controls
163
Online Edition

Turning ambient light on/off
The ambient light is switched on when the ve-
hicle is unlocked, and switched off when the
vehicle is locked.
If
the ambient light was deactivated via iDrive,
it will not be turned on when the vehicle is
unlocked.
Selecting the color
You can choose the color of the ambient light
in Personal Mode.
1.
Go through the menu as follows: Apps
menu / "Vehicle" / "Interior lighting" /
"Ambient lighting" / "Color".
2.
Select the desired setting.
Setting the brightness
The brightness of the ambient light can be ad-
justed.
1.
Go through the menu as follows: Apps
menu / "Vehicle" / "Interior lighting" /
"Ambient lighting".
2.
"Background light" or "Accent lighting"
3.
Select the desired setting.
Dynamic light
With the Dynamic Light function, certain ac-
tions, e.g., incoming calls or obstacles detected
when opening door, are indicated by light ef-
fects. If the ambient light is disabled, the light
effects will continue to be shown, depending
on vehicle equipment.
1.
Go through the menu as follows: Apps
menu / "Vehicle" / "Interior lighting" /
"Ambient lighting" / "Lighting effects".
2.
Select the desired setting.
Reduced lighting when driving at
night
Some lights of the interior lighting are reduced
when the vehicle is driven in the dark.
To activate/deactivate this function, go
through the menu as follows: Apps menu /
"Vehicle" / "Interior lighting" / "Ambient
lighting" / "Reduced for night driving".
Speaker lighting
Some speakers in the vehicle
are illuminated.
The speaker lighting is switched on when the
vehicle is unlocked, and switched off when the
vehicle is locked.
Window wiper system
Principle
The wiper system makes sure that you have a
clear view, e.g., in the rain. It is operated using
the wiper lever on the steering wheel.
Safety information
WARNING
If the wipers start moving in the folded away
state, body parts can be jammed or damage
may occur to parts of the vehicle. There is
a risk of injury and risk of property damage.
Make sure that the vehicle is switched off
when the wipers are in the folded-away state
and the wipers are folded in when switching
on.
NOTICE
The wiper blades can become prematurely
worn or damaged if used on dry window
glass for long periods of time. The wiper mo-
tor can overheat. There is a risk of property
damage. Do not use the wipers when the
window glass is dry.
Light and view
Controls
165
Online Edition

Activating rain sensor
To activate the rain sensor: Push the wiper
lever upward from position 0,
arrow 1, once.
Wiping operation is started.
The LED in the wiper lever is illuminated.
In
frosty conditions, wiping operation may not
start.
Deactivating rain sensor
To deactivate the rain sensor: Push the wiper
lever back to position 0.
Adjusting the rain sensor sensitivity
To adjust the sensitivity of the rain sensor, turn
the thumbwheel on the wiper lever as follows:
▷
To set the rain sensor sensitivity to high,
turn the thumbwheel up.
▷
To set the rain sensor sensitivity to low,
turn the thumbwheel down.
Window washer system
Safety information
WARNING
The washer fluid may freeze to the window
glass at low temperatures and obstruct your
view. There is a risk of accident, injury,
and property damage. Only use the window
washer system when the washer fluid will not
freeze. Use antifreeze if needed.
NOTICE
When the washer fluid reservoir is empty,
the washer pump cannot work as intended.
There is a risk of property damage. Do not
use the washer system when the washer
fluid reservoir is empty.
Cleaning the windshield
To clean the windshield, pull the wiper lever
back.
The washer fluid
is sprayed on the windshield,
and the wipers are turned on briefly.
Windshield washer nozzles
The windshield washer nozzles are automati-
cally heated while standby state is switched
on.
Light and view
Controls
167
Online Edition
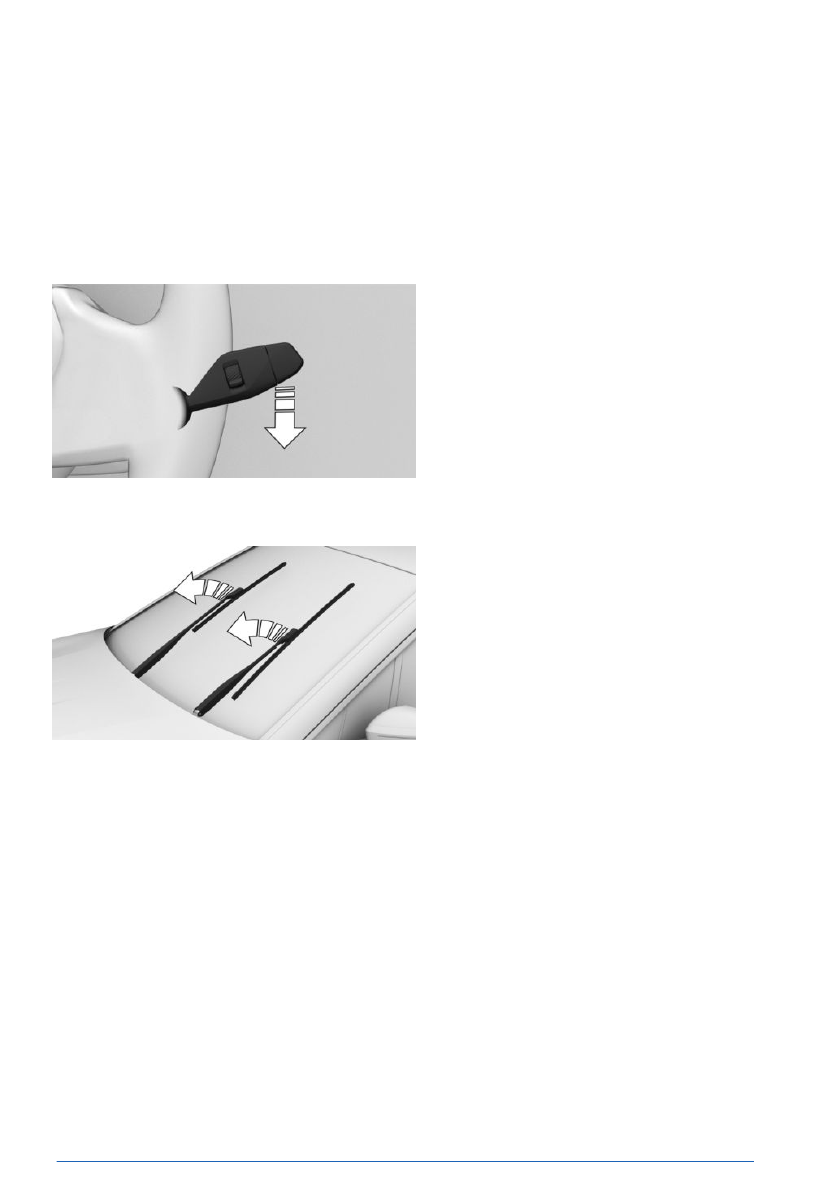
Folding out the wipers
To fold the wipers away from the windshield,
proceed as follows:
1.
Activate standby state.
2.
Push the wiper lever down or forward and
hold it until the wipers stop in an approxi-
mately vertical position.
3.
Fold the wipers all the way out from the
windshield.
Folding in the wipers
To fold in the wipers, proceed as follows:
1.
Fold the wipers back in toward the wind-
shield.
2.
Turn on standby state, then press the wiper
lever down or forward again
and hold it.
The wipers return to their rest position and
are ready for operation.
Light and view
Controls
169
Online Edition
")


