
Opening and closing
Vehicle features and options
This chapter describes model-specific equip-
ment, systems, and functions that are currently
available, or may become available in the fu-
ture, even if they are not
present in the vehicle.
Additional information:
Vehicle equipment, refer to page
.
Vehicle key
Principle
The vehicle comes with one or two vehicle
keys, depending on vehicle equipment and na-
tional-market
version.
Vehicle keys contain a replaceable battery as
well as an integrated
key.
BMW Digital Key come with a vehicle key.
If the vehicle key cannot be detected, drive-
ready state cannot turn on via emergency de-
tection of the vehicle
key.
A BMW ID or a driver profile with personal set-
tings can be assigned to a
vehicle key.
Depending on the equipment and national-
market version, various settings are possible
for the button functions. To change the button
settings, a BMW ID or driver profile must be
assigned to the corresponding
vehicle key.
To provide information on maintenance rec-
ommendations, the service data is stored in
the vehicle key.
To
prevent possible locking in of the vehicle
key, take the vehicle key with you when exiting
the vehicle.
Safety information
WARNING
The vehicle key has a button cell battery.
Batteries or button cell batteries can be swal-
lowed and lead to serious or fatal injuries
within two hours, for example due to internal
burns or chemical burns. There is a risk of
injury and danger to life. Keep the vehicle
key and batteries out of reach of children.
Immediately seek medical help if there is any
suspicion that a battery or button cell battery
has been swallowed or is located in any part
of the body.
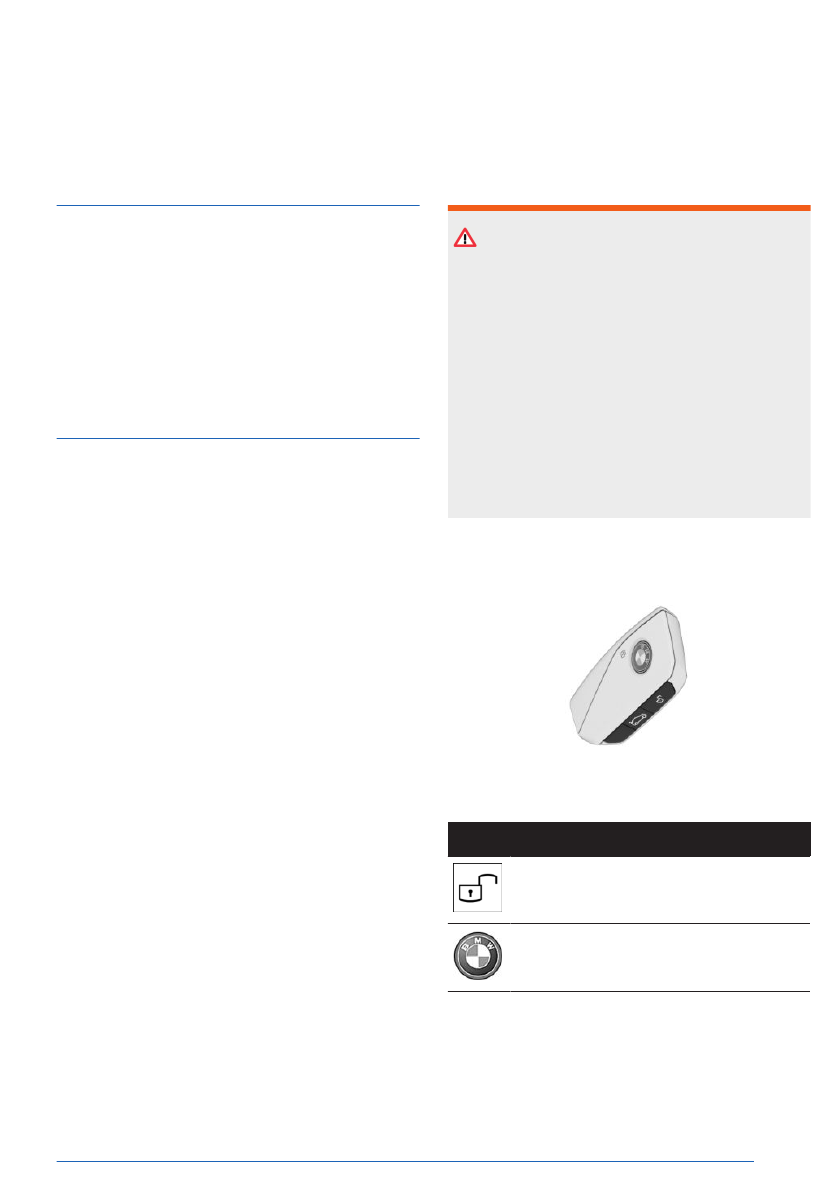
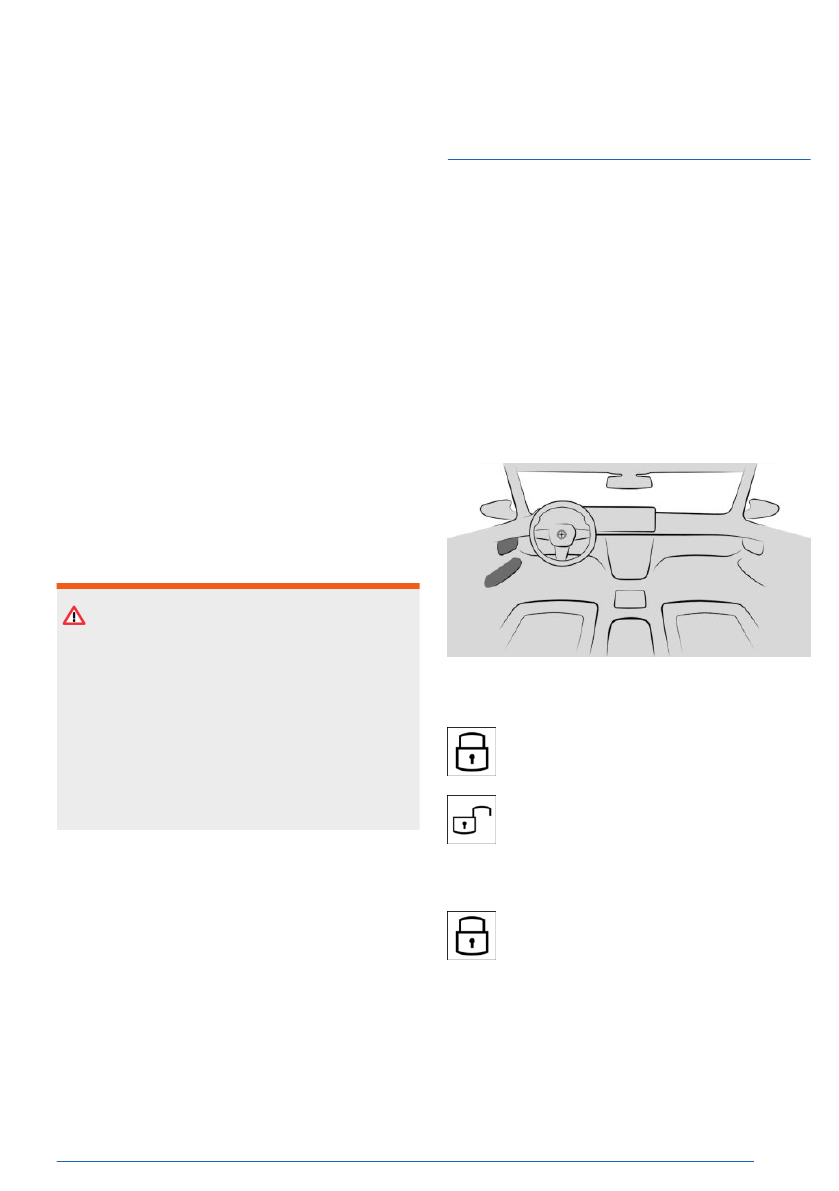
Overview
Buttons on the vehicle key.
Icon
Meaning
Unlock the vehicle.
Lock the vehicle.
Pre-conditioning, refer to page
Opening and closing
Controls
69
Online Edition
5.
Insert the battery housing into the vehicle
key.
6.
Insert the cover into the vehicle key.
Have old batteries disposed of by an
authorized service center or another
qualified service center or repair shop,
or take them to a collection point.
Batteries contain harmful chemicals.
Disposing of batteries with household
waste is prohibited by law.
Integrated key
Principle
The integrated key is built into the vehicle key.
If the electrical system malfunctions, the vehi-
cle can be unlocked and locked manually using
the integrated
key.
Depending on the national-market version, the
integrated key will fit in the glove compart-
ment.
Safety information
WARNING
For some national-market versions, unlock-
ing from the inside is only possible with par-
ticular knowledge.
There
is a risk of injury and danger to life if
people or animals remain in the vehicle for
a long period of time and are exposed to ex-
treme temperatures. Do not lock the vehicle
from the outside when there are people or
animals in it. Do not leave babies, toddlers or
animals alone in the vehicle.
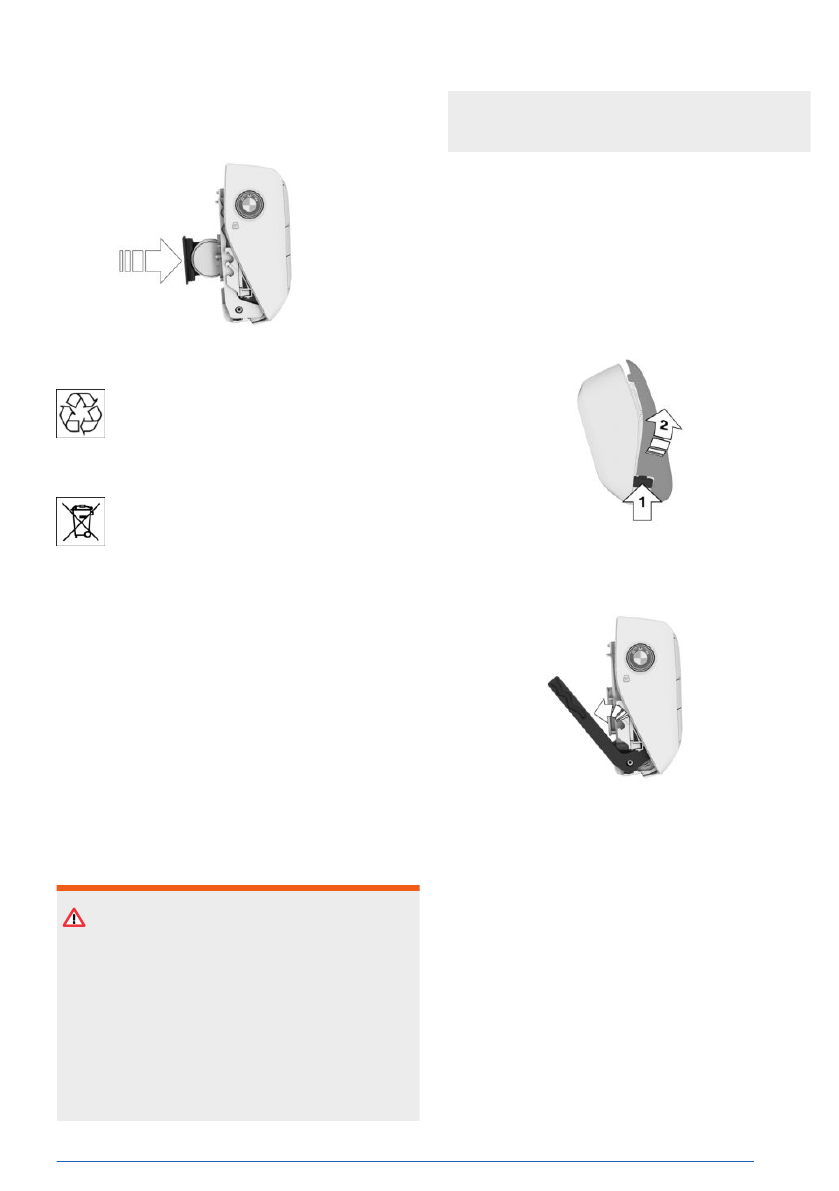
Removing the integrated key
To remove the integrated key, proceed as fol-
lows:
1.
Press and hold the button, arrow 1. At the
same time, push the cover to the front and
remove it from the side, arrow 2.
2.
Slide out the integrated key on the open
side of the vehicle key.
3.
Remove the integrated key from the vehicle
key.
Opening and closing
Controls
71
Online Edition
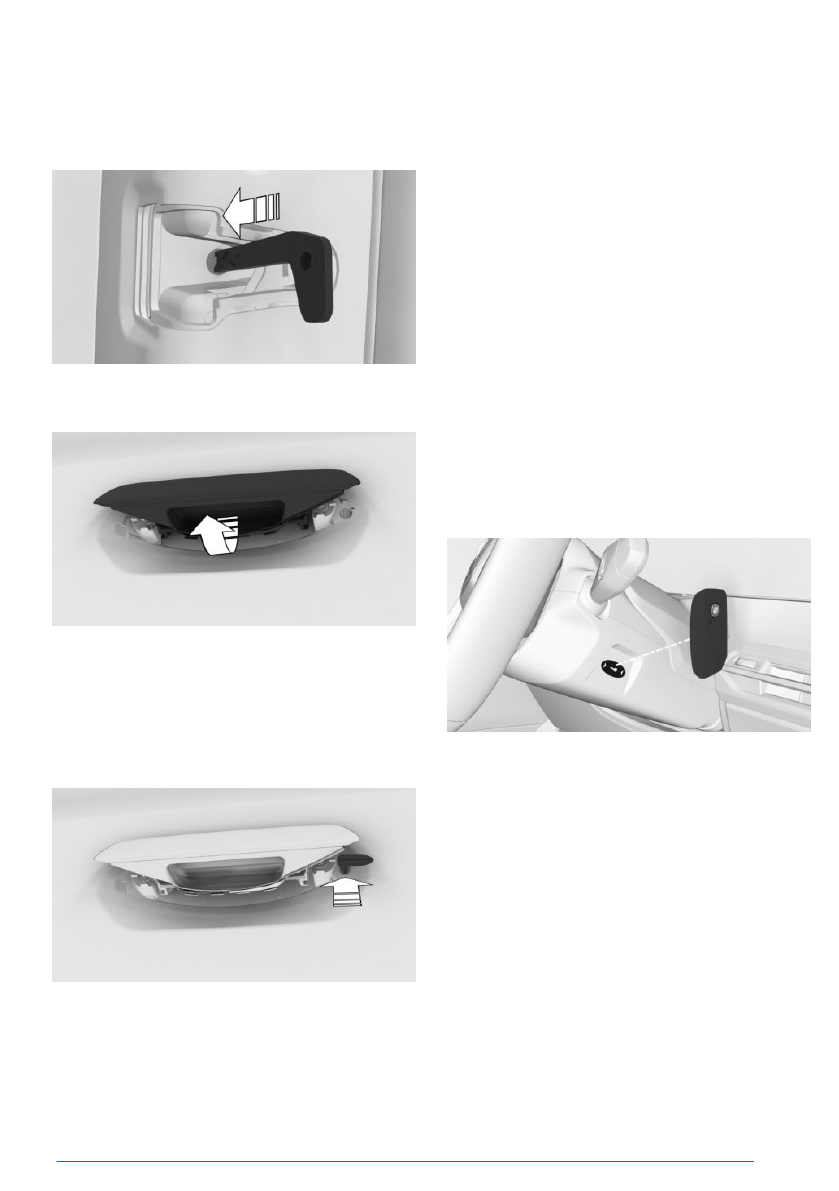
With the integrated key, close and lock all
doors, except the driver's door, using the
side door lock.
2.
Pull and hold the driver's door handle out-
ward with one hand.
3.
The position of the integrated key in the
door lock depends on the
vehicle.
Lock the door lock using the integrated key,
turning it clockwise. Turn the key approx.
50°, beyond the resistance point, to the
stop.
4.
Pull out the vehicle key and release the
door handle.
5.
Close the driver's door.
6.
Pull the door handles to make sure they are
locked. If necessary, repeat the process.
Alarm system
If the vehicle is unlocked with the integrated
key via the door lock, the activated alarm sys-
tem will be triggered when
the door is opened.
In this case, use the vehicle key emergency
detection to switch off the
alarm.
If the doors are manually locked from the in-
side, the alarm system is not activated.
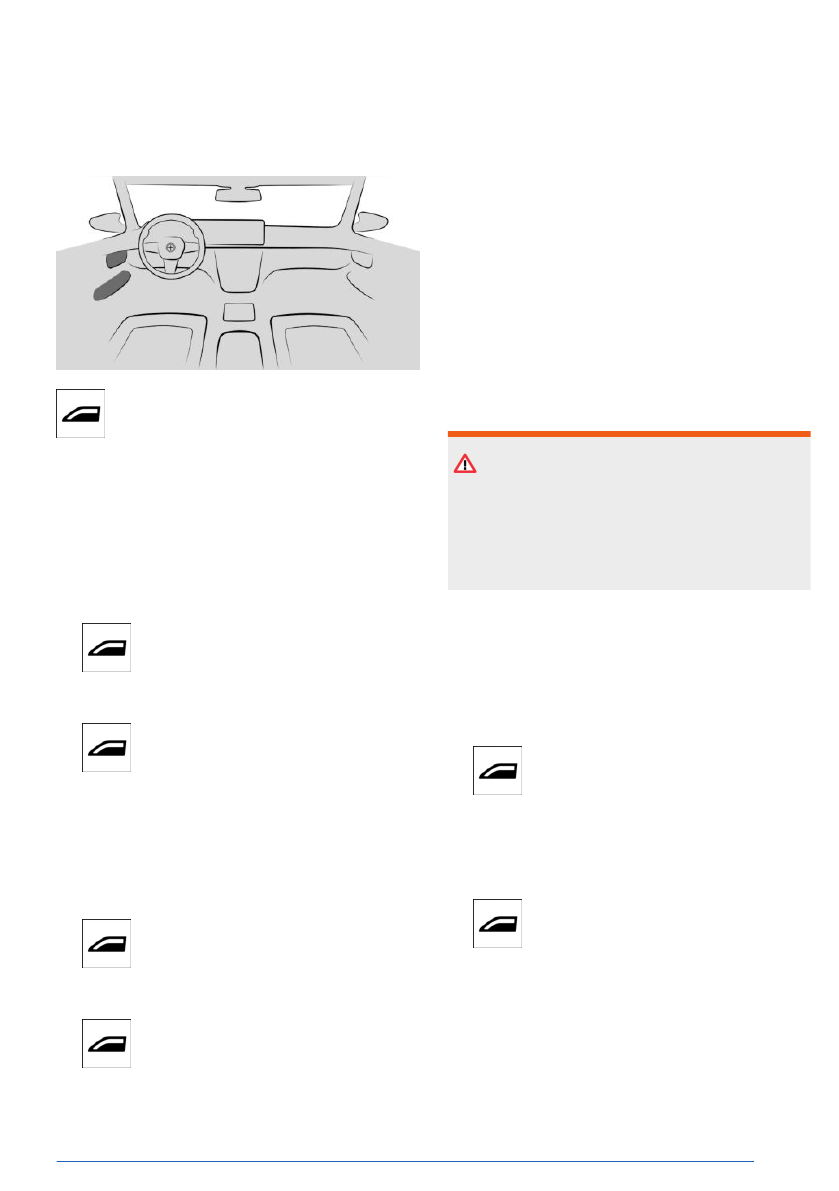
Emergency detection of the vehicle
key
Principle
If the vehicle key cannot be detected, drive-
ready state cannot turn on via emergency de-
tection of the vehicle key.
Turning on the drive-ready state
1.
To turn on drive-ready state via emergency
detection of the vehicle key, hold the back
of the vehicle key to the marking on the
steering column.
2.
Pay attention to the information shown on
the instrument cluster.
▷
If the vehicle key is
detected:
Turn on drive-ready state within 10 sec-
onds.
▷
If the vehicle key is not
detected:
Change the position of the vehicle key
slightly.
Opening and closing
Controls
73
Online Edition

imum charge of the rechargeable battery
depends on the smartphone.
▷
Bluetooth and ultra-wideband must be en-
abled on the smartphone in order to use
hands-free unlocking/locking with the digi-
tal key.
Activating the main digital key with
the Setup Card
Vehicle owner's smartphone is enabled as a
main digital key in the vehicle. To enable, the
vehicle owner must verify their authorization
for the vehicle.
The
Setup Card is used to set up the main
digital key. A vehicle key is also required to ver-
ify authorization. The Setup Card and the My
BMW App are used to start the setup process
for the main digital key. Hold the Setup Card to
the smartphone or scan the QR code using the
smartphone camera. Follow the instructions
on the
smartphone.
Complete the activation of the digital master
key in the vehicle. To do so, follow the instruc-
tions on the smartphone and control display. A
vehicle key must be located in the vehicle for
activation.
Sharing digital keys
General information
Digital Key allows the sharing of digital keys
with other people. This is possible using
the vehicle owner's smartphone or a smart-
phone with the corresponding authorization.
This function must be supported by the smart-
phone.
Forwarding authorization
To share the digital key, select the correspond-
ing function on the smartphone, for instance in
the Wallet app.
As soon
as a digital key is shared with another
person, the person will receive an invitation.
When the invitation is accepted, the digital key
on the recipient's smartphone will be activated.
Limiting the range of functions
Certain functions of the digital key can be lim-
ited before handing it over. For example, you
can disable restrictions for driving stability con-
trol systems and reduce the engine power be-
fore giving your digital key
to a novice driver.
Unlock the vehicle with the corresponding dig-
ital key in order to activate a functional limita-
tion. To turn on drive-ready state, place the
smartphone in the tray. A Check Control mes-
sage appears if there are active functional lim-
itations. This Check Control message can be
viewed again in the Message
Center.
If there are no active functional limitations, ad-
ditional digital keys or vehicle keys may have
been detected. In this case, manually switch to
the driver profile with the
functional limitations.
For more information, refer to the Connected-
Drive customer portal and the My BMW App.
Authentication
Depending on the recipient’s smartphone
model, an authentication may be required for
security and safety
reasons.
An authorized vehicle key, a digital key
with corresponding authorization, or another
method may be used for authentication. Fol-
low the corresponding instructions on the
smartphone or the control display.
Deleting digital keys
General information
Deleted digital keys will be removed from the
list of enabled digital
keys.
Deleted digital keys cannot be restored.
Deleting the main digital key
The main digital key can be deleted using a
smartphone or via iDrive.
Opening and closing
Controls
75
Online Edition

Changing smartphones
To use a new smartphone as a master Digital
Key, activate the new smartphone according to
the instructions for the master Digital Key. The
previous main key can be deleted when the
new smartphone is activated.
Sale of the vehicle
Prior to selling a vehicle, reset the Digital Key
function or remove the vehicle from the Con-
nectedDrive account of the current vehicle ow-
ner.
When the vehicle is
removed from the Con-
nectedDrive account, all digital keys for the ve-
hicle will be deleted. The Service Card's digital
key is retained and deactivated.
Malfunction
Your digital key may not be detected by the
vehicle under the following circumstances:
▷
The smartphone is shielded from the sen-
sors in the vehicle by a smartphone cover
that is not suitable.
▷
There is an object, e.g., a chip card, be-
tween the smartphone and smartphone
case.
▷
The connection has been interrupted by a
transmission tower or other device with a
high transmitting power.
▷
The smartphone is shielded by a building or
metallic object.
▷
Some smartphones offer the option to pro-
tect the digital key with additional authenti-
cation. If using the digital key, the user must
authenticate themselves, e.g., via PIN, fin-
gerprint, or facial
recognition.
If the recognition system is not functional,
the digital key can no longer be used. If
there is no other vehicle key available, the
vehicle can be locked/unlocked using Re-
mote Services in the My BMW App on an-
other smartphone. Alternatively, the vehicle
can be unlocked by the BMW Connected-
Drive call center upon request.
BMW Digital Key Service
Card
Principle
The Service Card is part of the BMW Digital
Key. A digital key that has already been paired
with the vehicle is stored on the Service Card.
The Service Card allows the vehicle to be un-
locked/locked and
started.
When using a smartphone as a digital key, the
deactivated Service Card must be located in
the vehicle. The Service Card can be given to
other people in situations that require the vehi-
cle to be handed over to another person. The
Service Card must be activated before it can be
handed over.
General information
Service Card availability depends on vehicle
equipment and national-market version.
Safety information
NOTICE
If the Service Card and a mobile device are
in the Wireless Charging tray at the same
time, the Service Card may become dam-
aged. There is a risk of property damage. Do
not place the Service Card in the Wireless
Charging tray at the same time as a mobile
device.
Opening and closing
Controls
77
Online Edition

Safety information
WARNING
People or animals in the vehicle can lock the
doors from the inside and lock themselves in.
In this case, the vehicle cannot be opened
from the outside. There is a risk of injury and
danger to life. Take the vehicle key with you
so that the vehicle can be opened from the
outside.
WARNING
For some national-market versions, unlock-
ing from the inside is only possible with par-
ticular knowledge.
There
is a risk of injury and danger to life if
people or animals remain in the vehicle for
a long period of time and are exposed to ex-
treme temperatures. Do not lock the vehicle
from the outside when there are people or
animals in it. Do not leave babies, toddlers or
animals alone in the vehicle.
WARNING
Unattended children or animals in the vehicle
can cause the vehicle to move and endanger
themselves and traffic, for example, due to
the following actions:
▷ Establishing
standby.
▷ Releasing the parking brake.
▷ Opening and closing the doors or win-
dows.
▷ Engaging selector lever
position N.
▷ Using vehicle equipment.
There is a risk of accident, injury, and prop-
erty damage. Do not leave children or ani-
mals unattended in the vehicle. Take the ve-
hicle key with you when exiting and lock the
vehicle.
Actions during unlocking
Depending on the settings, the following func-
tions are performed when unlocking the vehi-
cle:
▷
Only the driver's door and the fuel filler flap
will be unlocked or all access to the vehicle
will be unlocked.
▷
The unlocking of the vehicle can be con-
firmed with a light signal or a sound signal.
▷
The welcome light can be turned on when
the vehicle is being unlocked.
In addition, the following functions are exe-
cuted:
▷
If a BMW ID or a driver profile was assigned
to the vehicle key, this BMW ID or driver
profile will be activated.
▷
The interior lights are switched on, unless
they were manually switched off.
▷
Depending on vehicle equipment, folded-in
exterior mirrors are folded
out.
If the exterior mirrors were folded in using
the button inside the vehicle, they will not
fold out when the vehicle is unlocked.
▷
Anti-theft protection is switched off.
▷
The alarm system is switched off.
Additional information:
▷
Settings, refer to page
▷
▷
BMW ID, refer to page
▷
Driver profiles, refer to page
.
Actions during locking
Depending on the settings, the following func-
tions are performed when locking the vehicle:
▷
The locking of the vehicle can be confirmed
with a light signal or a sound signal.
▷
Depending on vehicle equipment, the exte-
rior mirrors can be folded in automatically
when locking. The exterior mirrors are not
folded in when the hazard warning system
is turned on.
Opening and closing
Controls
79
Online Edition

Unlocking the vehicle using the door
handle
To unlock the vehicle using the door handle,
reach into the recessed grip on one of the front
doors.
Locking the vehicle with the door han-
dle
1.
To lock the vehicle using the door handle,
close the driver’s door.
2.
Touch the grooved surface on the closed
front door handle for approx. 1 second and
hold it there without reaching into the re-
cessed grip.
Malfunction
Wet or snowy conditions may disrupt the lock-
ing request detection on the
door handles.
In the case of a malfunction, unlock and lock
the vehicle using the buttons of the vehicle key
or use the integrated key.
Touchless unlocking/locking of the
vehicle
Principle
The vehicle will be unlocked when an author-
ized vehicle key is detected in the unlocking
zone.
The unlocking
zone is located within a radius
of approx. 5 ft/1.50 m around the side and rear
of the vehicle.
The
vehicle will be locked when the vehicle key
leaves the locking
zone.
The locking zone is located within a radius of
approx. 9 ft/3 m around the side and rear of
the vehicle.
Automatic
unlocking and locking must be acti-
vated in the settings.
General information
The function is available
with Comfort Access.
Depending on the national-market version,
touchless unlocking and locking is also possi-
ble for compatible smartphones with a digital
key. To use the digital key for hands-free lock-
ing/unlocking, Bluetooth must be enabled on
the smartphone.
If the
vehicle key is located in the unlocking
zone for an extended period of time without
movement, the vehicle will be locked automati-
cally.
Depending on
vehicle equipment, the following
restrictions apply if someone is detected on a
seat when the vehicle is locked:
▷
The vehicle will be locked but not secured
against theft.
▷
The alarm system is not activated.
▷
The fuel filler flap remains unlocked.
Additional
information:
BMW Digital Key, refer to page
Opening and closing
Controls
81
Online Edition
Unlocking/locking the vehicle with the
BMW Digital Key
Hold the smartphone NFC antenna directly at
the center of the driver's door handle. The po-
sition of the near field communication antenna
depends on the smartphone
model.
When locking the vehicle with the smartphone,
make sure that all doors and the cargo area
are closed.
With the My BMW App
The My BMW App Remote Services include
options to lock and unlock a vehicle, among
other functions.
This
requires an active BMW ConnectedDrive
contract, and the My BMW App must be instal-
led on the smartphone used.
Access to the cargo area
Principle
The cargo area can be opened and closed as
follows:
▷
With the vehicle key.
▷
In the cargo area.
▷
Inside the vehicle.
▷
Hands-free opening/closing.
General information
The cargo area will be opened to the config-
ured opening height.
Safety information
WARNING
Body parts can be jammed when operating
the tailgate. There is a risk of injury. Make
sure that the travel path of the tailgate is
clear during opening and closing.
WARNING
The tailgate swings back and up when it
opens. There is a risk of injury and risk of
property damage. Make sure that the travel
path of the tailgate is clear during opening
and closing.
WARNING
Sharp or pointed objects may strike the win-
dow glass and heating elements when driv-
ing. There is a risk of injury or risk of property
damage. Cover the edges and ensure that
pointed objects are not able to strike the win-
dow glass.
With the vehicle key
General information
To avoid locking the vehicle key in the vehicle,
do not place the vehicle key
in the cargo area.
Depending on vehicle equipment and national-
market version, the following settings can be
changed:
▷
Unlocking the cargo area with the vehicle
key also unlocks the doors.
▷
Before unlocking the cargo area with the
vehicle key, first unlock the vehicle.
Opening and closing
Controls
83
Online Edition

In the interior
Functional prerequisites
To open the cargo area using the button in-
side, the trailer power socket must not be oc-
cupied.
The vehicle key
or digital key must be located
inside the vehicle in order to close the cargo
area using the button in the
vehicle interior.
When the vehicle is locked, selector lever posi-
tion P must be engaged before the cargo area
lid can be opened using the button in the vehi-
cle interior.
Opening the cargo area
To open the cargo area, press the
open/close button for the cargo area
on the driver's door.
Closing the cargo area
To close the cargo area, pull and hold
the open/close button for the cargo
area on the driver's door.
An acoustic signal sounds before the cargo
area is closed.
Interruption of the opening proce-
dure
The opening process stops in the following sit-
uations:
▷
When the vehicle starts moving.
▷
By pressing the button on the outside of
the cargo area. Pressing it again closes the
cargo area again.
▷
By pressing the button on the inside of the
cargo area. Pressing it again closes the
cargo area again.
▷
By pressing the button on the vehicle key.
Pressing the button again continues the
opening process.
▷
By pressing or pulling the button in the
driver's door. Pressing again continues the
opening procedure.
Interruption of the closing procedure
The closing process stops in the following sit-
uations:
▷
If the vehicle drives off with a jerky move-
ment.
▷
By pressing the button on the outside of
the cargo area. Pressing it again opens the
cargo area again.
▷
By pressing the button on the inside of
the cargo area. Pressing it again opens the
cargo area again.
▷
By pressing the button on the vehicle key.
Pressing it again opens the cargo area
again.
▷
By releasing the button in the driver's door.
Pulling again and holding continues the
closing motion.
Opening/closing the cargo area
hands-free
Principle
Touchless opening and closing of the cargo
area is possible when carrying the vehicle key
on your person.
Sensors
detect specific foot movements near
the center of the rear area, and the cargo area
opens or closes.
General information
This function is available with Comfort Access
and depends on the
national-market version.
If the vehicle key is within the sensor range, the
cargo area may open or close inadvertently if
you unintentionally move your foot or if a foot
movement is detected.
Opening and closing
Controls
85
Online Edition
System limits
The detection of the foot movement may be
limited due to the following external conditions:
▷
Ice, snow or slush on the rear of the vehicle.
▷
Dirt or road salt on the rear of the vehicle.
▷
Due to covers of any kind in the sensor
range.
When the trailer hitch is extended, the foot
movement detection function may not work
properly.
Movement in
range of the sensors may cause
the cargo area to open unintentionally, e.g.,
due to running water when cleaning the vehi-
cle or from heavy rainfall, or due to the mov-
ing brushes in a car wash. To prevent such
unintended opening of the cargo area in such
cases, keep the vehicle key at a sufficient dis-
tance from the rear of the vehicle.
Malfunction
WARNING
With manual operation of a blocked tailgate,
it can release itself unexpectedly from the
blocking. There is a risk of injury and risk
of property damage. Do not operate the tail-
gate manually if it is blocked. Have the vehi-
cle checked by an authorized service center
or another qualified service center or repair
shop.
In the event of an electrical malfunction in the
automatic tailgate, operate the unlocked tail-
gate slowly with a smooth
motion by hand.
To close the tailgate fully, press down lightly
only. Closing occurs automatically.
Buttons for the central lock-
ing system
Principle
The vehicle can be locked/unlocked from the
inside using the central locking system but-
tons.
The vehicle is
automatically locked when driv-
ing off.
In the event of
a severe accident, the vehicle
is automatically unlocked. The hazard warning
system and interior lights are illuminated.
Overview
The central locking buttons are located on the
front door.
The lock button.
The unlock button.
Locking the vehicle from inside
To lock the vehicle from the inside,
press the lock button on the front door
when the front doors are closed.
If the vehicle was locked from the inside, the
LED in the button illuminates.
The fuel filler flap remains
unlocked.
The vehicle is not secured against theft when
locking.
Opening and closing
Controls
87
Online Edition

▷
"Flash when
unlocking"
Unlocking is confirmed by two flashes.
▷
"Flash when
locking"
Locking is confirmed by one flash.
▷
With alarm
system:
"Sound on lock/unlock"
Unlocking is confirmed with two sound
signals, locking is confirmed with one
sound signal.
Folding mirrors in automatically
To configure the side mirrors to fold in
automatically, go through the menu as fol-
lows: Apps menu / "Vehicle" / "Doors and
windows" / "Lock" / "Lock/unlock" / "Fold
mirrors on lock/unlock".
Cargo area
Cargo area button on vehicle key
It is possible to choose where to assign the
cargo area button on the vehicle key.
1.
Go through the menu as follows: Apps
menu / "Vehicle" / "Keys" / "Vehicle key" /
"Tailgate button".
2.
Select the desired setting:
▷
"Tailgate"
Depending on the equipment, the cargo
area will be unlocked or opened.
▷
"Tailgate and
door(s)"
Depending on the equipment, the cargo
area will be unlocked or opened and the
doors are unlocked.
▷
"Tailgate will only open if vehicle is
already
unlocked"
The vehicle must be unlocked before
the cargo area can be operated with the
vehicle key.
▷
"Lock tailgate
button"
Operating the cargo area with the vehi-
cle key is disabled.
Adjusting the opening height
You can set how far the tailgate can be
opened.
When adjusting
the opening height, make sure
the clearance above the tailgate is at least
4 in/10 cm.
1.
Go through the menu as follows: Apps
menu / "Vehicle" / "Doors and windows" /
"Tailgate" / "Opening height"
2.
Monitor the tailgate and set the desired
opening height.
Opening/closing the cargo area
hands-free
1.
To configure the settings for hands-free
opening/closing of the cargo area, go
through the menu as follows: Apps
menu / "Vehicle" / "Doors and windows" /
"Tailgate"
2.
Select the desired setting:
▷
"Open with foot movement"
▷
"Close with foot movement"
Window
Opening windows automatically
1.
To configure the settings for automatic
opening of the windows, go through the
menu as follows: Apps menu / "Vehicle" /
"Doors and windows"
2.
Select the desired setting.
If this setting is enabled, the driver’s window
opens automatically as soon as the vehicle
reaches the saved location.
Alarm system
Principle
The alarm system issues a visual and acoustic
signal when someone attempts to open the
locked vehicle incorrectly.
Opening and closing
Controls
89
Online Edition

Alarm system error.
▷
The indicator light goes out
after unlocking:
The vehicle has not been tampered with.
▷
The indicator light flashes after unlocking
until drive-ready state is switched on, but
no longer than approx.
5 minutes:
The alarm has been triggered.
Tilt alarm sensor
The tilt alarm sensor is part of the alarm sys-
tem and monitors the vehicle's
tilt.
The alarm system triggers, for example, when
someone attempts to steal a wheel or when
the vehicle is towed.
Interior motion sensor
The interior motion sensor is part of the alarm
system and monitors the
vehicle interior.
The alarm system triggers when movement is
detected inside the
vehicle.
The windows and/or the glass sunroof must
be closed for this system to function properly.
Avoiding unintentional alarms
General information
The tilt alarm sensor and interior motion sen-
sor can trigger an alarm, although no unau-
thorized action
occurred.
An unintentional alarm can be triggered in the
following situations:
▷
In car washes.
▷
In duplex garages.
▷
During transport on trains carrying vehicles,
at sea or on a trailer.
▷
With animals in the vehicle.
▷
When the vehicle is locked after start of re-
fueling.
The tilt alarm sensor and the interior motion
sensor can be switched off in such situations.
Switching off the tilt alarm sensor and
interior motion sensor
The tilt alarm sensor and interior motion sen-
sor can be turned off as follows:
▷
As soon as the vehicle is locked,
press the lock button on the vehicle
key within 30 seconds.
The indicator light illuminates for approx.
2 seconds and then continues to flash.
▷
After turning off the standby state, an
option to turn off the interior motion sensor
and the tilt alarm sensor will be displayed
on the control display.
▷
With a digital key via the My BMW App.
The tilt alarm sensor and interior motion sen-
sor are deactivated until the vehicle is locked
again.
Ending the alarm
To stop the alarm, unlock the
vehicle.
If the vehicle is unlocked with the integrated
key, the drive-ready state must subsequently
be turned on via the emergency detection of
the vehicle key.
Window
Principle
The windows can be operated as follows:
▷
With the vehicle key.
▷
Using the door handle.
▷
Using the switches inside the vehicle.
Opening and closing
Controls
91
Online Edition
Inside the vehicle
Overview
The power window switches are lo-
cated on the doors.
Functional requirements
The vehicle key or a digital key is inside the
vehicle.
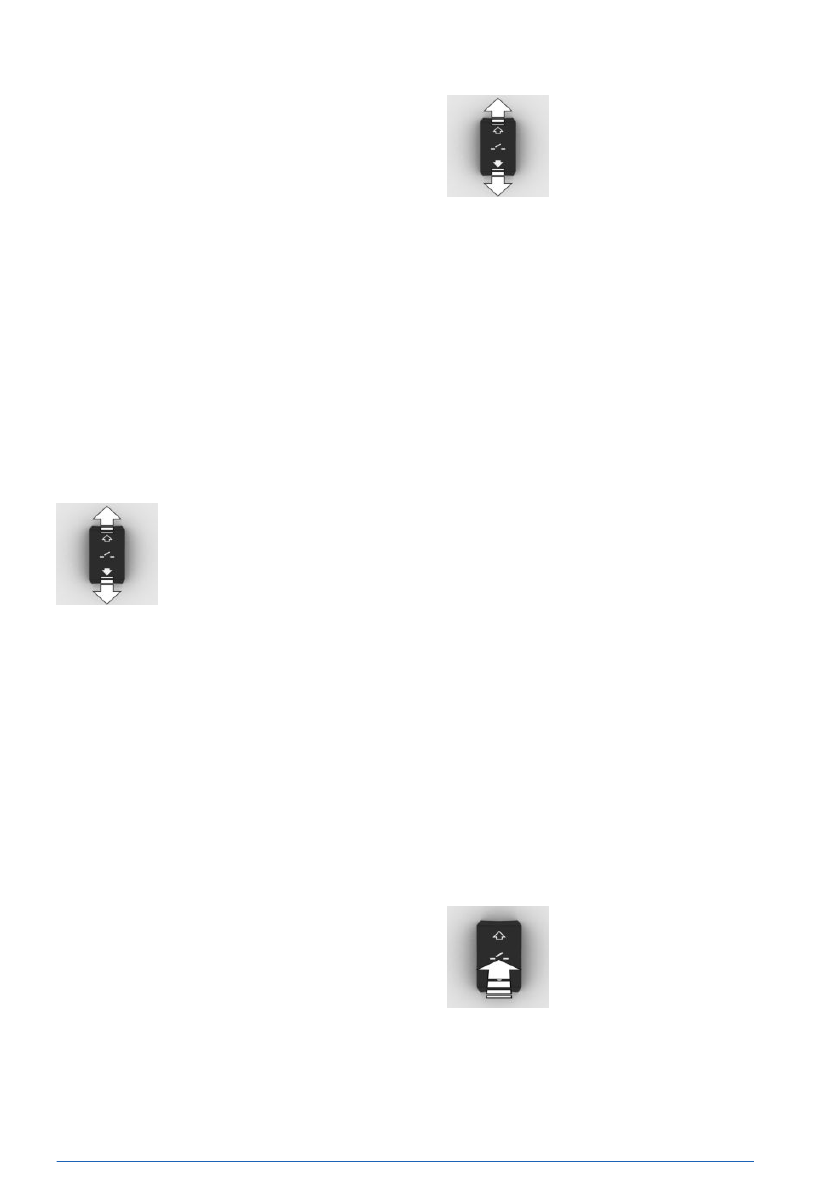
Opening windows
To open the windows, proceed as follows:
▷
On the door, press the power win-
dow switch to the resistance
point.
The window opens while the switch
is being held.
▷
On the door, press the power win-
dow switch past the resistance
point.
The window opens automatically. Pressing
the switch again stops the motion.
Closing the windows
To close the windows, proceed as follows:
▷
On the door, pull the power window
switch to the resistance
point.
The window closes while the switch
is being held.
▷
On the door, pull the power window
switch past the resistance
point.
The window closes automatically.
Pulling again stops the motion.
Anti-trap mechanism
Principle
The anti-trap mechanism prevents objects or
body parts from becoming trapped between
the door frame and window glass while a win-
dow is closing.
General information
If resistance or blockage is detected while a
window is being closed, the closing will be in-
terrupted.
Safety information
WARNING
Accessories on the windows such as anten-
nas can impact anti-trap mechanism. There
is a risk of injury. Do not install accessories in
the travel path of the windows.
Closing without the anti-trap mecha-
nism
In case of danger from the outside or if icing
might prevent normal closing, proceed as fol-
lows:
1.
On the door, pull the power window
switch past the resistance
point and hold it.
The window closes with limited anti-trap
mechanism. If the closing force exceeds a
certain threshold, closing is stopped.
2.
On the door, pull the power win-
dow switch past the resistance point again
within approx. 4 seconds and
hold it there.
The window closes without the anti-trap
mechanism.
Opening and closing
Controls
93
Online Edition

Depending on the vehicle equipment, exterior
mirrors are folded in unless they were folded
in while locking. The exterior mirrors are not
folded in when the hazard warning system is
turned on.
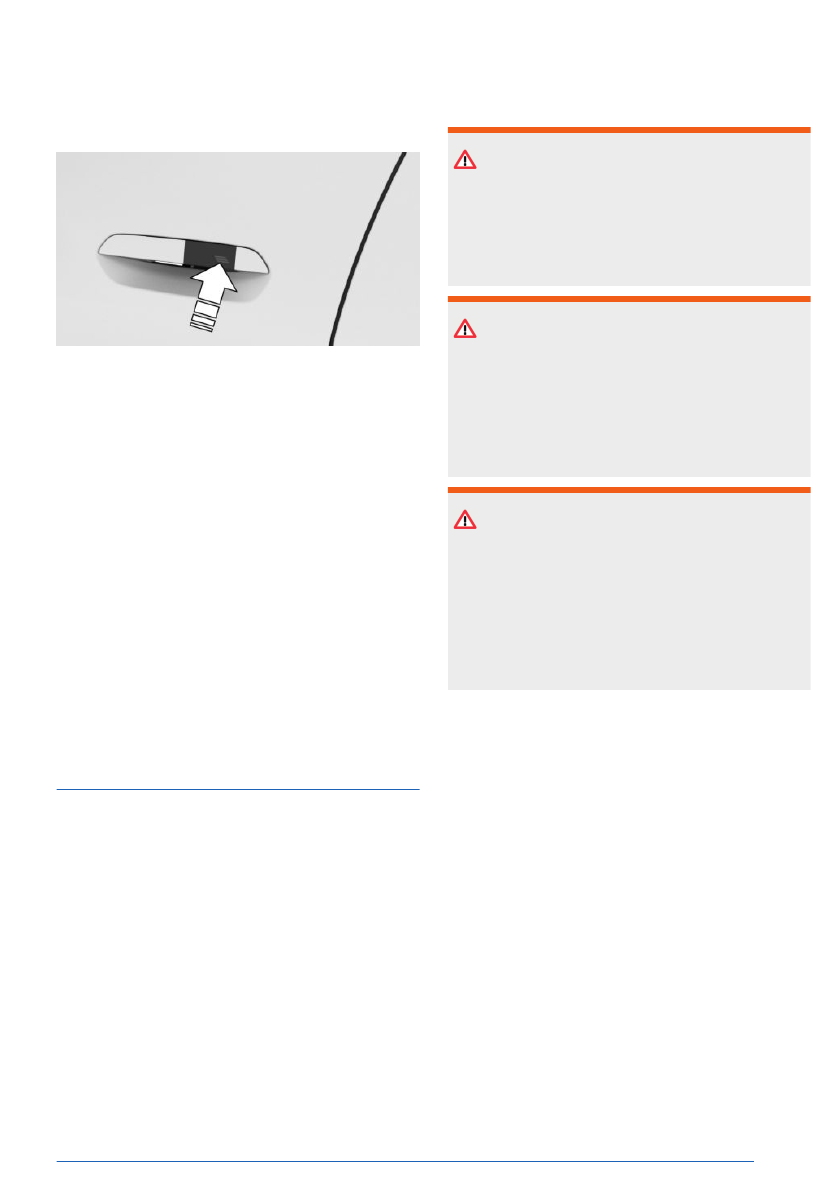
On the door handle
Principle
The glass sunroof can be closed using the
door handle without operating
the vehicle key.
The vehicle key is automatically detected near
the vehicle.
General information
Function availability depends on vehicle equip-
ment.
Depending on the
country, the glass sunroof
can also be closed via the door handle using
compatible smartphones and
your digital key.
Additional information:
BMW Digital Key, refer to page
Functional requirements
To close the glass sunroof using the door han-
dle, the following functional requirements must
be met:
▷
Carry the vehicle key with you, e.g., in your
pants pocket.
▷
Bluetooth must be activated on the smart-
phone to close the glass sunroof using the
digital key.
Closing glass sunroof
To close the glass sunroof using the door han-
dle of a closed front door, place a finger on the
grooved surface of the door handle and hold it
there without reaching into the recessed grip.
In addition to locking, the windows and glass
sunroof with sun protection
will be closed.
Depending on the vehicle equipment, exterior
mirrors are folded in unless they were folded
in while locking. The exterior mirrors are not
folded in when the hazard warning flashers are
switched on.
Inside the vehicle
General information
The glass sunroof and the sun protection are
operated using the same switch.
Overview
The glass sunroof/sun protec-
tion switch is located in the
headliner.
Opening and closing
Controls
95
Online Edition
Anti-trap mechanism
Principle
The anti-trap mechanism prevents objects or
body parts from becoming jammed between
the roof frame and glass sunroof while the
glass sunroof is
closing.
If resistance or a blockage is detected while
the glass sunroof is closing, it will stop closing
when the roof reaches the half-open position
or when closing from the tilted position.
Closing from the open position without
the anti-trap mechanism
In case of danger from the outside or if icing
might prevent normal closing, proceed as fol-
lows:
1.
Close all doors.
2.
Turn on drive-ready state or stop the vehi-
cle if moving.
3.
In the headliner, push the glass sun-
roof/sun protection switch forward, past the
resistance point, and hold it
there.
The glass sunroof closes with limited anti-
trap mechanism. If the closing force ex-
ceeds a certain threshold, closing is stop-
ped.
4.
Push the switch forward again past the
resistance point and hold, until the glass
sunroof closes without the anti-trap mech-
anism. Make sure that the closing path is
clear.
Closing from the lifted position without
the anti-trap mechanism
In case of danger from the outside or if icing
might prevent normal closing, proceed as fol-
lows:
1.
Close all doors.
2.
Turn on drive-ready state or stop the vehi-
cle if moving.
3.
In the headliner, push the glass sun-
roof/sun protection switch forward, past the
resistance point, and hold it there.
Initializing after a power interruption
General information
After a power interruption during the opening
or closing process, the glass sunroof can only
be operated to a limited extent. Initializing the
system can help in this
case.
The system can be initialized under the follow-
ing conditions:
▷
The vehicle is parked in a horizontal posi-
tion.
▷
The vehicle will not be moved until the initi-
alization is completed.
▷
The drive-ready state is established.
▷
The outside temperature is above
41℉/5℃.
During initialization, the glass sunroof closes
without the anti-trap
mechanism.
Make sure that the closing path is clear.
Initializing the system
To initialize the system, in the
headliner, press the glass sun-
roof/sun protection switch up-
ward and hold it until initializa-
tion is complete:
Initialization begins within 15 seconds.
Opening and closing
Controls
97
Online Edition
")


