

Parking
Vehicle features and options
This chapter describes model-specific equip-
ment, systems, and functions that are currently
available, or may become available in the fu-
ture, even if they are not
present in the vehicle.
Additional information:
Vehicle equipment, refer to page
.
Parking assistance systems
Principle
With the Park Distance Control display and
various camera views, the parking assistance
systems help to park, maneuver, and reverse
the vehicle. Parking assistance systems are
operated using the Park Assist key or via the
Parking menu.
When
parking or reversing, the following indi-
vidual systems provide active support with as-
sistance functions and sensors:
▷
Park Distance Control, refer to page
.
▷
Active Park Distance Control, refer to
page
.
▷
Drive-Off Monitoring, refer to page
▷
▷
Maneuver Assistant, refer to page
.
▷
Remote Control Parking, refer to page
▷
Back-up Assistant, refer to page
▷
Trailer Assistant, refer to page
.
Various camera views and camera perspec-
tives provide excellent visibility of the vehi-
cle surroundings while parking and maneuver-
ing. Depending on vehicle equipment, different
camera views are
available.
The following camera views can be used with
the basic version:
▷
Rear View Camera, refer to page
.
▷
Trailer hitch view, refer to page
.
▷
Panorama view, rear, refer to page
.
Depending on vehicle equipment, additional
camera views can be used with parking view:
▷
Semi-automatic camera perspective, refer
▷
Automatic camera perspective, refer to
page
▷
Side view, refer to page
.
▷
3D view, refer to page
.
▷
Car wash view, refer to page
.
▷
Panorama view, front, refer to page
.
▷
Activating panorama view using activation
points, refer to page
▷
Door opening angle, refer to page
.
▷
Remote 3D View, refer to page
The camera-based individual systems are op-
erated with the function bars on the control
display. The camera views can be turned on
and off by selecting the corresponding icon.
Additional views with parking assistance lines
or obstacle markings can be shown.
Safety information
WARNING
The system cannot serve as a substitute for
the driver’s personal judgment in assessing
the traffic situation. Based on the limits of
the system, it cannot independently react to
all traffic situations. There is a risk of acci-
dent, injury, and property damage. Adjust
driving style to traffic conditions. Watch the
surrounding traffic situation closely, be ready
to take over steering and braking at any time,
and actively intervene where appropriate.
Parking
Controls
247
Online Edition
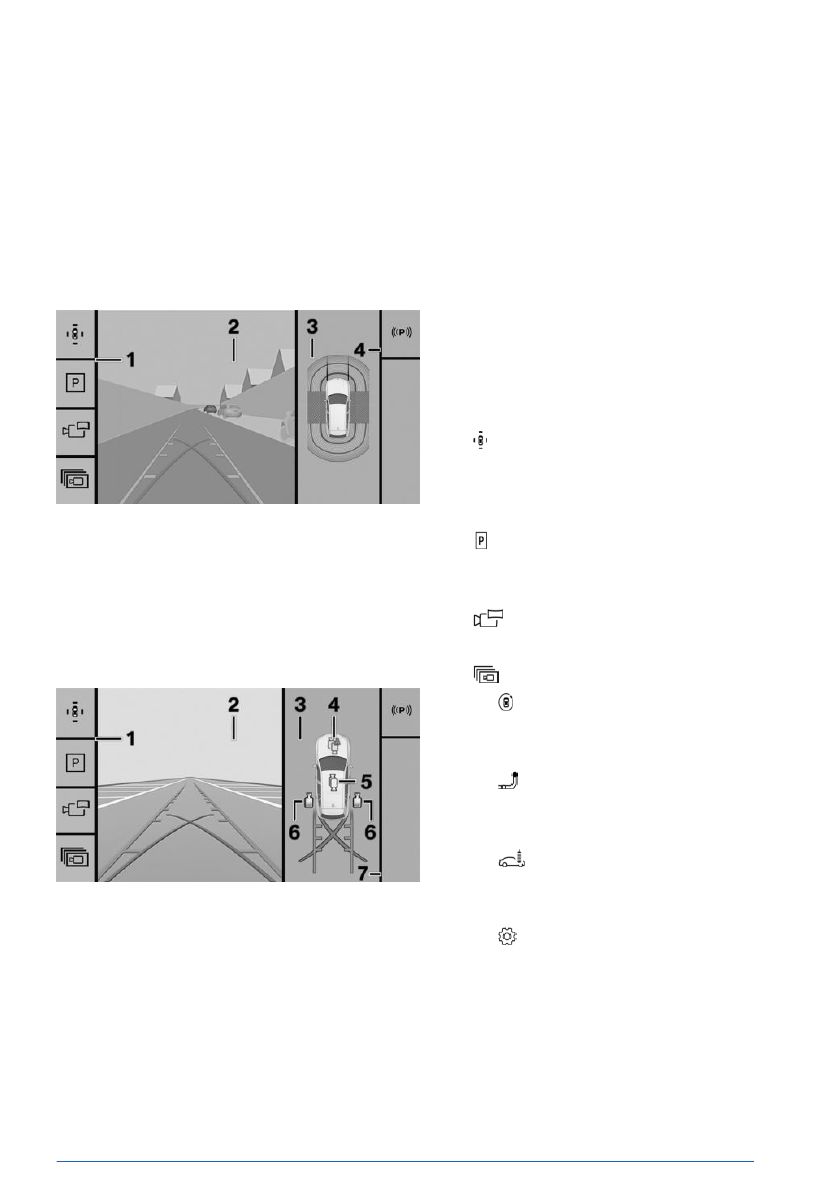
Display on the control display
General information
The parking assistance system view on the
control display varies depending on vehicle
equipment and the parking assistance system
activated.
Assistance view
1
Toolbar, left
2
Camera image
3
Vehicle top view
4
Toolbar, right
Parking view
1
Toolbar, left
2
Camera image
3
Selection window
4
Automatic camera perspective
5
Semi-automatic camera perspective
6
Side view
7
Toolbar, right
Camera image
Depending on the equipment, one or more
cameras capture the area from different se-
lectable
perspectives.
Depending on the view, the vehicle's surround-
ings or a part of it is
depicted.
Depending on the national-market version, ei-
ther the automatic or the semi-automatic cam-
era perspective is displayed.
Toolbar, left
Different views and settings can be selected
using the left toolbar, depending on vehicle
equipment:
▷
"Parking view"
Depending on vehicle equipment, camera
views or the Park Distance Control view are
displayed.
▷
"Assist view"
A stylized top view of the vehicle is dis-
played.
▷
"Panorama view"
The cross traffic view is displayed.
▷
"More"
▷
"3D view"
A three-dimensional view of the vehicle
is displayed.
▷
"Trailer coupling view"
The view shows the zoom onto the
trailer hitch.
▷
"Car wash view"
Your own lane can be displayed to make
it easier to drive into a car wash.
▷
"Settings"
Settings can be entered in the Park
menu.
Toolbar, right
The Parking Assistant functions are displayed
in the right toolbar:
Parking
Controls
249
Online Edition
Parking aid lines
Pathway lines
The pathway lines help to estimate the re-
quired space when parking and maneuvering
on level
roads.
Depending on the engaged gear position, the
pathway lines are displayed in front of or be-
hind the vehicle in the camera image on the
control display.
The
pathway lines are continuously adjusted
to the steering movements depending on the
steering-wheel angle.
Turning circle lines
The turning circle lines show the path with the
smallest possible turning circle on level roads
in the camera image on the
control display.
Only one turning circle line is displayed after
the steering wheel is turned past a certain an-
gle.
Turning circle
lines can only be superimposed
on the camera image together with pathway
lines.
Using parking aid lines
1.
Position the vehicle so that the red turning
circle line leads into the boundaries of the
parking space.
2.
Turn the steering wheel so that the green
pathway line covers the corresponding
turning circle line.
Obstacle marking
The sensors detect obstacles
when parking.
The obstacles detected by the Park Distance
Control are shown and marked in the camera
image on the control
display.
Colored gradients for the obstacle markings in
green, yellow and red indicate the distances.
Functional limitations
The parking assistance systems can only be
used to a limited extent in the following situa-
tions:
▷
With a door open.
▷
With open cargo area.
▷
With exterior mirrors folded in.
Areas with gray hatching with an icon in the
camera image identify areas that are currently
not shown such as an open door.
Parking
Controls
251
Online Edition

Parking assistance systems displays are
shown on the control display.
2.
Engage selector lever
position R.
The Rear View Camera view is switched on.
Depending on vehicle equipment: The
icon for automatic camera perspective is
automatically selected in the selection win-
dow.
To exit Rear View Camera view, select another
camera view in the selection window or press
the Park Assist key again.
Deactivated Rear View Camera
When the Rear View Camera is deactivated,
for instance when the cargo area is open, the
camera image is displayed with gray shading.
Semi-automatic camera
perspective
Principle
Depending on the parking direction and en-
gaged selector lever position, the semi-auto-
matic camera perspective shows a fixed cam-
era perspective with the areas in front of or
behind the vehicle.
You
can turn the camera perspective on or off
using the control
display.
In addition, note the information in Chapter
"Parking assistance systems".
Turning the semi-automatic camera
perspective on/off
1.
To switch on the semi-automatic
camera perspective, press the Park Assist
key on the center
console.
Parking assistance systems displays are
shown on the control display.
2.
Select the semi-automatic camera per-
spective icon in the selection window.
To exit the fixed camera view, select another
camera view in the selection window.
Automatic camera perspec-
tive
Principle
The automatic camera perspective shows a
steering-dependent view in the respective driv-
ing direction. This perspective adapts to the
respective driving
situation.
As soon as obstacles are detected, the view
changes to a fixed display of the area in front
of or behind the bumper, or switches to side
Park Distance Control as
necessary.
The side Park Distance Control is automati-
cally displayed when the automatic camera
perspective is turned on. The function shows
obstacles located next to
the vehicle.
You can turn the camera perspective on or off
using the control
display.
In addition, note the information in Chapter
"Parking assistance systems".
Turning the automatic camera per-
spective on/off
Turning the camera view on/off auto-
matically
When the parking assistance systems' display
is turned on, automatic camera perspective is
selected automatically.
The icon for automatic camera perspective
is automatically selected in the selection win-
dow.
To exit the
steering-dependent camera view,
select another camera view in the selection
window.
When reverse
gear is engaged, the automatic
camera perspective is, if necessary, exited and
the system uses a semi-automatic camera
perspective to the rear. If necessary, select the
Parking
Controls
253
Online Edition

swiping the vehicle in the middle of the camera
image.
The current
perspective is marked with a cam-
era icon on the circular
path.
3D view can be turned on or off using the con-
trol display.
In
addition, note the information in Chapter
"Parking assistance systems".
Turning the 3D view on/off
1.
To switch on 3D view, press the
Park Assist key on the center
console.
Parking assistance systems displays are
shown on the control display.
2.
Go through the menu as follows: "More" /
"3D view".
To exit the 3D view, select another camera
view on the left toolbar.
Trailer hitch view
Principle
To make it easier to attach a trailer, you can
zoom in on the view of the
trailer hitch.
When zooming in, remember that the view
may no longer show certain
obstacles.
Trailer hitch view can be turned on or off using
the control display.
In
addition, note the information in Chapter
"Parking assistance systems".
Turning the trailer hitch view on/off
1.
To switch on trailer hitch view, press
the Park Assist key on the
center console.
Parking assistance systems displays are
shown on the control display.
2.
Go through the menu as follows: "More" /
"Trailer coupling view".
To exit the trailer hitch view, select another
camera view in the left toolbar.
Display
Two static circle segments are displayed in the
camera image. These circle segments help to
estimate the distance of the trailer to the trailer
hitch.
A docking line
dependent on the steering-
wheel angle helps with aiming for the trailer
with the trailer hitch.
Car wash view
Principle
The car wash view assists when entering a car
wash.
This function can
be turned on or off on the
control display.
In
addition, note the information in Chapter
"Parking assistance systems".
Turning the car wash view on/off
1.
To switch on the car wash view,
press the Park Assist key on the center
console.
Parking
assistance systems displays are
shown on the control display.
2.
Go through the menu as follows: "More" /
"Car wash view".
Parking
Controls
255
Online Edition

hicle equipment, the front camera view is dis-
played when forward gear is engaged.
Automatic activation of pan-
orama view
Principle
Positions at which panorama view should
switch on automatically can be saved as acti-
vation points.
Up to ten
activation points can be saved and
deleted.
The activation
points can be used when driv-
ing forward and, depending on national-mar-
ket version, when
reversing.
In addition, note the information in Chapter
“Panorama view”.
Functional requirements
To have panorama view activate automati-
cally, the following functional requirements
must be met:
▷
A GPS signal must be received.
▷
Depending on national-market version: You
must activate a BMW ID or driver profile.
▷
The Rear View Camera and front camera
must be installed.
▷
The direction of travel, the selector lever
position, and the vehicle angle must match
a stored activation point.
Storing activation points
Desired activation points can be saved.
1.
Drive your vehicle to the location where you
want panorama view to switch on automat-
ically, then stop.
2.
Press the Park Assist key on the
center console.
Parking assistance systems displays are
shown on the control display.
3.
Go through the menu as follows:
"Panorama view" / "Activation point" /
"Save activation point".
Activation points are saved with the following
information, for example:
▷
With the city/town.
▷
With the city/town and the street.
▷
A default name.
Using activation points
To enable/disable the use of activation points,
go through the menu as follows: Apps
menu / "Vehicle" / "Driving settings" / "Driver
Assistance" / "Parking" / "GPS-based".
Deleting activation points
Activation points can be deleted, individually or
collectively.
1.
Press the Park Assist key on the
center console.
Parking
assistance systems displays are
shown on the control display.
2.
Go through the menu as follows:
"Panorama view" /
"Manage points".
A list of all saved activation points is dis-
played.
▷
To delete an activation point, swipe over
the desired activation point.
▷
To delete all activation points, select the
following function: "Delete all points".
Door opening angle
Principle
Depending on vehicle equipment, the door
opening angle display is shown automatically
when stationary.
Parking
Controls
257
Online Edition

System limits
Remote 3D View may not be fully operational
or may not be available in the following situa-
tions:
▷
With a door or the cargo area open. Dark
fields in the display indicate areas that are
not recorded by the system.
▷
With manually folded-in exterior mirrors.
▷
When other camera functions are being
performed in the vehicle.
▷
The vehicle moves faster than walking
speed.
▷
In case of missing or weak Internet connec-
tion.
Park Distance Control
Principle
Park Distance Control assists with parking.
Acoustic and visual warnings signal obstacles
in front of or behind the
vehicle.
Obstacles that are detected by the side ultra-
sonic sensors can also be
reported.
The range of Park Distance Control, depending
on obstacles and environmental conditions, is
approx. 6 ft/2 m.
Park
Distance Control turns on and off auto-
matically in certain situations. You can enable
or disable automatic activation on the control
display.
In addition,
note the information in Chapter
"Parking assistance systems".
Safety information
WARNING
The system cannot serve as a substitute for
the driver’s personal judgment in assessing
the traffic situation. Based on the limits of
the system, it cannot independently react to
all traffic situations. There is a risk of acci-
dent, injury, and property damage. Adjust
driving style to traffic conditions. Watch the
surrounding traffic situation closely, be ready
to take over steering and braking at any time,
and actively intervene where appropriate.
WARNING
Due to high speeds when the Park Distance
Control is activated, the warning can be de-
layed due to physical circumstances. There is
a risk of injury and risk of property damage.
Avoid approaching an object too fast. Avoid
driving off quickly while Park Distance Control
is not yet active.
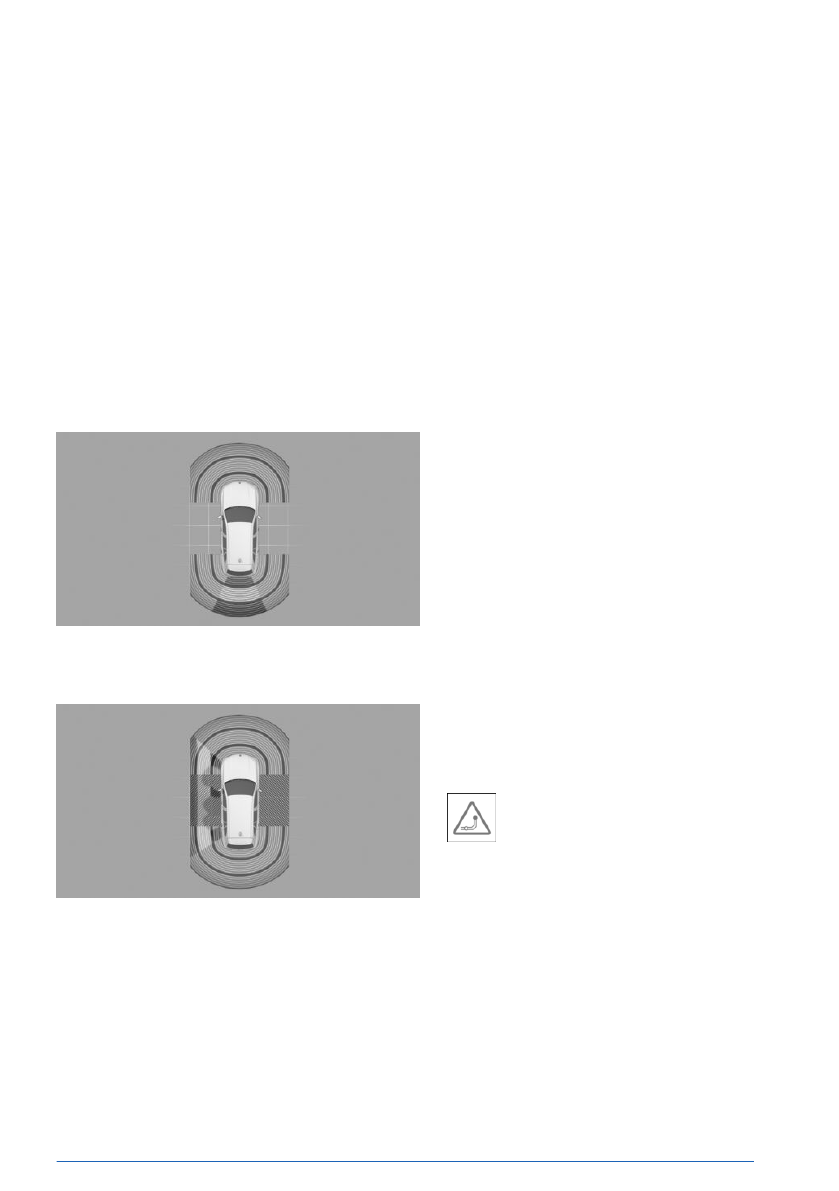
Sensors
Park Distance Control is controlled by the fol-
lowing sensors:
▷
Ultrasonic sensors in the front/rear bump-
ers.
▷
Ultrasonic sensors at the sides.
Turning Park Distance Control
on/off
Turning on the system automatically
Park Distance Control switches on automati-
cally in the following situations:
▷
When drive-ready state is switched on
when selector lever position R is engaged.
▷
While approaching detected obstacles
if the speed is lower than approx.
2.5 mph/4 km/h. The activation distance
depends on the situation in question.
To activate/deactivate automatic activation
when obstacles are detected, go through the
menu as follows: Apps menu / "Vehicle" /
"Driving settings" / "Driver Assistance" /
"Parking" / "Automatic PDC activation".
Parking
Controls
259
Online Edition
indicate when obstacles are detected within
the detection range.
If
your vehicle is equipped with the Cross Traf-
fic Warning, a warning is also shown on the
display for vehicles approaching from the side
at the rear and
front.
To protect the sides of the vehicle, obstacle
markings are displayed on the sides of the ve-
hicle.
Display
Depending on vehicle equipment, warnings
may be displayed in front of, next to, and be-
hind the vehicle.
Example display of warnings behind the vehi-
cle.
Example display of warnings next to the vehi-
cle.
The gray shaded areas indicate the sensor
detection range. No obstacles have been de-
tected within detection
range.
Colored markings in the shaded area indicate
that obstacles have been detected within the
detection range.
If the shaded area is not continuous, the area
next to the vehicle has not been scanned yet.
System limits
General information
The function for protecting the vehicle sides
only shows stationary obstacles that were pre-
viously detected by the sensors when passing
by.
Park Distance
Control does not detect when
an obstacle moves later. When the vehicle is
stationary, the gray shaded areas on the sides
are hidden after a certain time. The area on
the side of the vehicle must
be newly captured.
Also follow the information on system limits in
the "Parking assistance systems" chapter.
Trailer towing
The rear functions of Park Distance Control are
turned off when towing a trailer or when the
trailer socket is
occupied.
Depending on vehicle equipment, the sensor
detection range is shown by the shaded area
on the control
display.
Obstacles next to the vehicle are not displayed.
Depending on the national-market
version, the
rear functions of Park Distance Control remain
switched on when trailer towing is enabled.
The trailer towing icon is shown on the
control display.
Additional
information:
Driving with trailer or rear carrier, refer to
Unwarranted warnings
Unwarranted warnings may be given if the
system limits of Park Distance Control are
reached.
To prevent
unwarranted warnings, for instance
in car washes, turn off automatic Park Dis-
tance Control activation on obstacle detection.
Parking
Controls
261
Online Edition

Deactivating Active Park Distance
Control temporarily
After emergency braking, Active Park Distance
Control can be temporarily deactivated on the
control display. A corresponding message is
displayed.
Go through
the menu as follows: "Configure" /
"Deactivate
temporarily".
No further emergency braking will be per-
formed in this situation as
you continue driving.
The function is automatically reactivated when
Park Distance Control is switched on again.
Settings
You can configure which areas of your vehicle
to protect with the Park Distance Control sys-
tem.
1.
Go through the menu as follows: Apps
menu / "Vehicle" / "Driving settings" /
"Driver Assistance" / "Parking" / "Active
PDC emergency braking".
2.
Select the desired setting.
Display
As soon as the system engages, an
icon is displayed with a corresponding
message.
System limits
General information
Follow the system limits in the "Parking assis-
tance systems" chapter.
Functional limitations
Active Park Distance Control cannot be used in
the following situations, for example:
▷
While Hill Descent Control is regulating the
vehicle speed, emergency braking is deacti-
vated.
▷
When driving with a trailer.
If applicable, turn off the system temporarily, if
needed.
Additional
information:
Hill Descent Control, refer to page
.
Drive-Off Monitoring
Principle
In case of a risk of collision, the Drive-Off Mon-
itoring reduces the drive power when driving
off.
When obstacles are
detected in close range in
front of the vehicle, the acceleration will be re-
duced. If necessary, this permits timely manual
braking.
When obstacles
are detected behind the vehi-
cle, the system will
brake.
Drive-Off Monitoring can be activated/deacti-
vated on the control
display.
You can cancel reduced acceleration, e.g., by
pressing the accelerator
twice.
In addition, note the information in Chapter
"Parking assistance systems".
Safety information
WARNING
The system cannot serve as a substitute for
the driver’s personal judgment in assessing
the traffic situation. Based on the limits of
the system, it cannot independently react to
all traffic situations. There is a risk of acci-
dent, injury, and property damage. Adjust
driving style to traffic conditions. Watch the
surrounding traffic situation closely, be ready
to take over steering and braking at any time,
and actively intervene where appropriate.
Parking
Controls
263
Online Edition

The ultrasonic sensors measure both sides of
the vehicle when driving slowly forward. Suita-
ble parking spaces are calculated based on the
objects detected, e.g., parking vehicles. The
system status is
displayed.
The system calculates the best possible park-
ing line for driving in or out of parking spaces,
and takes control of the
vehicle while parking.
The operating principle and operation of Park
Assist is divided into the following steps:
▷
Parking space search.
▷
Turning on.
▷
Parking.
▷
Driving out of parking spaces.
The parking manoeuver while parking is per-
formed
automatically.
When driving out of parallel parking spaces,
the vehicle maneuvers automatically until it
reaches a position where it can be driven out
of the parking space without further steering
movements.
When driving
out of perpendicular parking
spaces, the vehicle is maneuvered out of the
parking space to enable continued driving in
the desired direction.
A
parking maneuver can be interrupted and
continued
manually.
Settings can be customized as desired, e.g., to
adjust how parking maneuvers are displayed
or to set a sound for
suitable parking spaces.
The Automatic Parking Assistant Professional
increases the comfort and range of uses of
the Automatic Parking Assistant. In addition to
the parking methods of the Automatic Parking
Assistant, parking in parking spaces that are
marked with lines is
possible.
The parking maneuver can also be performed
using Remote Control Parking on a smart-
phone.
In addition,
note the information in Chapter
"Parking assistance systems".
Vehicle features and options
This system may not be available in the
owned vehicle, e.g. due to the selected op-
tional equipment, the national-market version
or the option for later enabling and software
updates. This also applies to individual func-
tions of the
system.
For information on whether a function is cur-
rently available in the vehicle or when the func-
tion can be installed in the vehicle, contact an
authorized service center or another qualified
service center or repair
shop.
Additional information:
Vehicle equipment, refer to page
.
Safety information
WARNING
The system cannot serve as a substitute for
the driver’s personal judgment in assessing
the traffic situation. Based on the limits of
the system, it cannot independently react to
all traffic situations. There is a risk of acci-
dent, injury, and property damage. Adjust
driving style to traffic conditions. Watch the
surrounding traffic situation closely, be ready
to take over steering and braking at any time,
and actively intervene where appropriate.
WARNING
When using the trailer hitch, the assistance
system cannot react correctly because the
sensors are obscured. There is a risk of ac-
cident, injury, and property damage. Do not
use the assistance system while towing a
trailer or when using the trailer hitch, e.g., for
a rear bicycle rack.
Parking
Controls
265
Online Edition

▷
Front camera.
▷
Exterior mirror cameras.
▷
Rear View Camera.
Functional requirements
Measurement of parking spaces
To measure parking spaces, the following
functional requirements must be met:
▷
Driving forward: up to approx.
22 mph/35 km/h.
▷
Maximum distance to row of parked vehi-
cles: approx. 5 ft/1.5 m.
Suitable parking space
To find suitable parking spaces, the following
functional requirements must
be met:
Longitudinal parking:
▷
Minimum length of detected object, e.g.,
parking vehicle: approx. 3 ft/1 m.
▷
Minimum length of gap between two
objects: vehicle length plus approx.
2.6 ft/0.8 m.
▷
Minimum depth: approx. 5 ft/1.5 m.
Perpendicular parking:
▷
Minimum length of detected object, e.g.,
parking vehicle: approx. 3 ft/1 m.
▷
Minimum width of gap: vehicle width plus
approx. 2.3 ft/0.7 m.
▷
The minimum depth corresponds to your
vehicle's length.
The
depth of perpendicular parking spaces
must be estimated by the driver. Due to
technical limitations, the system is only able
to approximate the depth of perpendicular
parking spaces.
Parking lines for Park Assist Professional:
▷
The parking space must be clearly marked
with lines.
▷
The one-time calibration of the camera af-
ter vehicle delivery must be complete. To
complete the calibration process, drive a
short distance of a few miles in daylight.
Parking operation
To pull into a parking space, the following
functional requirements must be met:
▷
The doors and cargo area are closed.
▷
The driver’s seat belt is fastened.
Leaving parking spaces
To pull out of a parking space, the following
functional requirements must be met:
▷
The vehicle was parked using the Auto-
matic Parking Assistant, and an object has
been detected in the area around the vehi-
cle.
▷
The vehicle was manually parked in re-
verse, and objects have been detected in
the immediate vicinity of the vehicle. The
distance to a detected curb is at least 6 in-
ches/15 cm.
▷
The parking space is at least 2.6 ft/0.8 m
longer than the vehicle.
Displays
General information
The current status of the Automatic Parking
Assistant is shown as follows:
▷
On the right toolbar on the control display.
▷
In the status field on the instrument cluster.
▷
On the Head-up display, depending on ve-
hicle equipment.
Different icons are shown on the control dis-
play for selecting the
parking method.
The sequence of the displayed icons corre-
sponds to the prioritized
parking option.
The direction of the arrow changes for the
icons for parking methods for driving out of a
parking space.
Parking
Controls
267
Online Edition

On the instrument cluster, select the sug-
gested parking method using the thumb-
wheel on the steering wheel.
4.
Follow the instructions on the control dis-
play or in the instrument cluster.
The status symbol for the Automatic
Parking Assistant illuminates green. The
system takes control of the
maneuver.
The speed can be reduced with the brake.
Other interventions will
cancel the system.
A message will be displayed at the end of
the maneuver.
5.
Make sure that the traffic situation permits
driving out of parking space and driving off
as usual.
The Automatic
Parking Assistant is turned
off automatically.
Canceling Automatic Parking Assis-
tant manually
The Automatic Parking Assistant can be can-
celed manually at any time, e.g.:
▷
Step lightly on the accelerator pedal twice
in succession.
▷
Step lightly on the accelerator pedal and
move the steering wheel slightly at the
same time.
▷
Depress the brake pedal and operate the
selector lever at the same time.
The Automatic Parking Assistant is canceled
without engaging selector lever position P.
Driving can continue immediately.
Canceling Automatic Parking Assis-
tant automatically
Park Assist is canceled automatically in situa-
tions such as the following:
▷
When the driver grasps the steering wheel
or takes over steering.
▷
When operating the accelerator pedal or
the selector lever.
▷
When setting the parking brake.
▷
When unfastening the driver's seat belt.
▷
With open cargo area.
▷
With open hood.
▷
With the doors open.
▷
During activation or intervention by driver
assistance systems.
▷
When changing over to another function on
the control display.
▷
When the view on the control display is
overlaid with messages.
▷
On snow-covered or slippery road.
▷
On steep uphill or downhill grades.
▷
When there are obstacles that are hard to
overcome such as curbs.
▷
When there are obstacles that suddenly ap-
pear.
▷
With insufficient distances, which are indi-
cated by Park Distance Control.
▷
When a maximum number of parking at-
tempts or the time taken for parking is ex-
ceeded.
When the system is automatically aborted,
selector lever position P is
engaged.
A Check Control message is displayed where
applicable.
Continuing the parking operation
If parking or leaving a parking space has been
interrupted, the operation can be continued, if
needed.
Restart the
Automatic Parking Assistant and
follow the instructions on the control display or
instrument cluster.
System limits
General information
Follow the system limits in the "Parking assis-
tance systems" chapter.
Parking
Controls
269
Online Edition
Safety information
WARNING
The system cannot serve as a substitute for
the driver’s personal judgment in assessing
the traffic situation. Based on the limits of
the system, it cannot independently react to
all traffic situations. There is a risk of acci-
dent, injury, and property damage. Adjust
driving style to traffic conditions. Watch the
surrounding traffic situation closely, be ready
to take over steering and braking at any time,
and actively intervene where appropriate.
WARNING
When using the trailer hitch, the assistance
system cannot react correctly because the
sensors are obscured. There is a risk of ac-
cident, injury, and property damage. Do not
use the assistance system while towing a
trailer or when using the trailer hitch, e.g., for
a rear bicycle rack.
WARNING
The system can steer the vehicle over or onto
curbs. There is a risk of injury and risk of
property damage. Watch surrounding traffic
closely and actively intervene where appro-
priate.
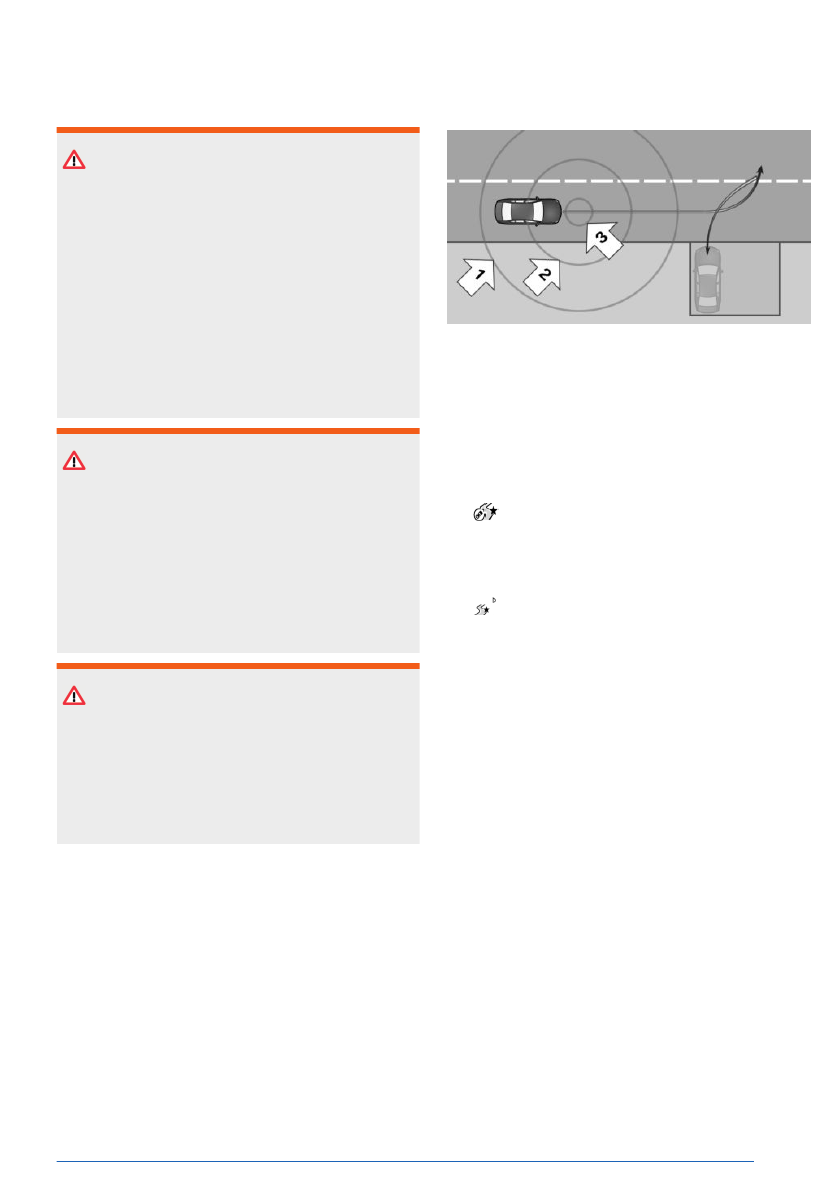
Detection range
The detection range for a maneuver is divided
into the following areas:
▷
Proximity range, arrow 1: the system will
begin with the localization in the back-
ground within a range of approx. 26 ft/8 m
around the distance covered of a stored
maneuver.
▷
Close range, arrow 2: in a range of ap-
prox. 6 ft/2 m around the distance covered,
a stored maneuver can be displayed on the
control display.
▷
Activation range, arrow 3: the stored
maneuver on the control display can be ac-
tivated within a range of approx. 3.5 ft/1 m.
After the activation, the system takes con-
trol of the vehicle and carries out the ma-
neuver automatically.
Sensors
The Maneuver Assistant is controlled by the
following sensors:
▷
Ultrasonic sensors in the front/rear bump-
ers.
▷
Ultrasonic sensors at the sides.
▷
Front camera.
▷
Exterior mirror cameras.
▷
Rear View Camera.
Functional requirements
To use the Maneuver Assistant, the one-off
calibration process of the camera after vehicle
delivery must be complete. To complete the
Parking
Controls
271
Online Edition

The Maneuver Assistant is canceled without
engaging selector lever position P. Driving can
continue immediately.
Canceling the Maneuver Assistant
automatically
The Maneuver Assistant is canceled automati-
cally in situations such as the following:
▷
When the driver grasps the steering wheel
or takes over steering.
▷
When operating the accelerator pedal or
the selector lever.
▷
When the driver's seat belt is not fastened.
▷
With open cargo area.
▷
With open hood.
▷
With the doors open.
▷
During activation or intervention by driver
assistance systems.
▷
When the system limits of the ultrasonic
sensors and cameras are reached.
▷
When changing over to another function on
the control display.
▷
When the view on the control display is
overlaid with messages.
▷
In case of obstacles.
▷
On snow-covered or slippery road.
▷
When the lane is too narrow.
▷
On steep uphill or downhill grades.
▷
With trailer towing.
In the event of an automatic cancellation of
the system, the vehicle is decelerated to a
complete stop and selector lever position P is
engaged.
An interrupted
maneuver can be continued, if
needed. Restart the Maneuver Assistant and
follow the instructions on the control display or
instrument cluster.
Editing stored maneuvers
Maneuvers can be deleted or renamed via
iDrive, individually or collectively.
1.
Go through the menu as follows: Apps
menu / "Vehicle" / "Driving settings" /
"Driver Assistance" / "Parking" / "Recorded
paths".
2.
Select the maneuver to be edited.
3.
Select the desired action.
System limits
General information
Follow the system limits in the "Parking assis-
tance systems" chapter.
Functional limitations
The Maneuver Assistant does not provide sup-
port when towing a
trailer.
System limits can cause functional limitations
such as in the following situations:
▷
With poor GPS reception.
▷
On steep uphill or downhill grades.
▷
In case of recorded maneuvers where the
system minimum distance to objects can-
not be maintained.
▷
Greatly deviating conditions when storing
and driving the distance covered, for in-
stance other tires or changed ambient con-
ditions like light conditions or weather.
▷
Delayed display of overlapping stored ma-
neuvers when driving into the activation
area.
▷
In multi-story parking garages, for record-
ings at different parking levels, or for re-
cordings that run over several parking lev-
els.
If the calibration process for the cam-
era is not completed after vehicle deliv-
ery, an icon appears on the display of
the parking assistance systems when reverse
gear is engaged.
Parking
Controls
273
Online Edition

Parking with Remote Control Park-
ing
1.
To perform the parking maneuver with Re-
mote Control Parking, engage selector lever
position P.
2.
Leave the vehicle and close the doors and
cargo area.
3.
Open Remote Control Parking in the My
BMW app and maneuver forward or back-
ward, or select the desired parking method.
4.
Follow the instructions on
the smartphone.
Stop the vehicle manually if obstacles are
present.
Depending on
the option selected in the My
BMW app, the vehicle is either parked at
the end of the parking maneuver or you can
take control of the vehicle again.
System limits
Due to ambient conditions, e.g., impaired Blue-
tooth connection transmission due to external
faults, Remote Control Parking may be inter-
rupted.
If the power
supply of the vehicle battery is
not sufficiently ensured, e.g., due to excessive
discharge, Remote Control Parking may not
be available. Follow the instructions in the My
BMW App.
It may not be
easy to maneuver into a parking
space. This function is offered on the My BMW
app but cannot be used due to ambient condi-
tions.
Back Up Assistant
Principle
The Back-up Assistant helps when reversing,
e.g., when pulling out of tight or unclear park-
ing or road
situations.
The vehicle stores the driving movements of
the last distance covered. This stored distance
can be driven in reverse with automated steer-
ing.
The Back-up
Assistant takes control of steer-
ing. The driver must control the speed using
the accelerator and brake
pedals.
With Back-up Assistant: a maximum distance
of 164 ft/50 m is
saved.
With Reversing Assistant Professional: a maxi-
mum distance of 656 ft/200 m
is saved.
In addition, note the information in Chapter
"Parking assistance systems".
Vehicle features and options
This system may not be available in the
owned vehicle, e.g. due to the selected op-
tional equipment, the national-market version
or the option for later enabling and software
updates. This also applies to individual func-
tions of the
system.
For information on whether a function is cur-
rently available in the vehicle or when the func-
tion can be installed in the vehicle, contact an
authorized service center or another qualified
service center or repair
shop.
Additional information:
Vehicle equipment, refer to page
.
Safety information
WARNING
The system cannot serve as a substitute for
the driver’s personal judgment in assessing
the traffic situation. Based on the limits of
the system, it cannot independently react to
all traffic situations. There is a risk of acci-
dent, injury, and property damage. Adjust
driving style to traffic conditions. Watch the
surrounding traffic situation closely, be ready
to take over steering and braking at any time,
and actively intervene where appropriate.
Parking
Controls
275
Online Edition

▷
Bring up the following menu via iDrive:
"Cancel".
▷
Press the Park Assist key on the
center console.
Canceling the Back Up Assistant
automatically
The Back Up Assistant is canceled automati-
cally in situations such as the following:
▷
When the driver grasps the steering wheel
or takes over steering.
▷
When shifting from reverse gear to another
selector lever position.
▷
During activation or intervention by driver
assistance systems.
▷
When exiting the stored lane when revers-
ing, for instance with maximum steering-
wheel angle.
▷
When the view on the control display is
overlaid with messages.
▷
In case of a slippery surface.
▷
When the vehicle is rolling such as on a
slope.
▷
In case of changed ambient conditions.
▷
When the trailer power socket is occupied
or when trailer towing is activated.
▷
If the vehicle speed exceeds approx.
6 mph/10 km/h.
▷
Reversing Assistant Professional: if sensor
functionality is limited beyond approx. 164
ft/50 m.
System limits
General information
Follow the system limits in the "Parking assis-
tance systems" chapter.
Speed threshold
The maximum speed when reversing is limited
to approx.
6 mph/10 km/h.
A warning is issued at a speed of approx.
4 mph/7 km/h.
If the
maximum speed is exceeded, the func-
tion is interrupted.
Functional limitations
Different influences can lead to side deviations
when driving the stored distance covered in
reverse. The following influences, for example,
can lead to deviation:
▷
Steering movements when the vehicle is
stationary while storing the distance cov-
ered.
▷
The speed is not adapted to the distance
covered.
▷
Certain road characteristics such as gradi-
ents, inclines or slippery road surface.
▷
Greatly deviating conditions when storing
and driving the route, for instance other
tires or changed ambient conditions like
weather.
▷
Light conditions changed for Reversing As-
sistant Professional.
Parking
Controls
277
Online Edition
")


