

ROADSIDE ASSISTANCE
Vehicles Sold in the United States:
Getting Roadside Assistance
To fully assist you should you have a
vehicle concern, Ford Motor Company
offers a complimentary roadside
assistance program. This program is
separate from the New Vehicle Limited
Warranty.
The service is available:
•
24 hours a day, seven days a week.
•
For the coverage period supplied with
your vehicle.
Roadside Assistance covers:
•
A flat tire change with a good spare
(except vehicles supplied with a tire
inflation kit).
•
Battery jump start.
•
Lock-out assistance (key replacement
cost is the customer's responsibility).
•
Fuel delivery — independent service
contractors, if not prohibited by state,
local or municipal law, shall deliver up
to 2 gal (8 L) of gasoline or 5 gal (20 L)
of diesel fuel to a disabled vehicle.
Roadside Assistance limits fuel delivery
service to two no-charge occurrences
within a 12-month period.
•
Winch out — available within 100 ft
(30 m) of a paved or county
maintained road, no recoveries.
•
Towing — independent service
contractors, if not prohibited by state,
local or municipal law, shall tow Ford
eligible vehicles to an authorized dealer
within 35 mi (56 km) of the
disablement location or to the nearest
authorized dealer. If a member
requests a tow to an authorized dealer
that is more than 35 mi (56 km) from
the disablement location, the member
shall be responsible for any mileage
costs in excess of 35 mi (56 km).
•
Roadside Assistance includes up to
$200 for a towed trailer if the disabled
eligible vehicle requires service at the
nearest authorized dealer. If the towing
vehicle is operational but the trailer is
not, then the trailer does not qualify for
any roadside services.
Vehicles Sold in the United States:
Using Roadside Assistance
Complete the roadside assistance
identification card and place it in your
wallet for quick reference. This card is in
the Owner's Manual kit.
United States vehicle customers who
require Roadside Assistance, call
1-800-241-3673.
If you need to arrange roadside assistance
for yourself, Ford Motor Company
reimburses a reasonable amount for
towing to the nearest dealership within
35 mi (56 km). To obtain reimbursement
information, United States vehicle
customers call 1-800-241-3673.
Customers need to submit their original
receipts.
234
Roadside Emergencies
Vehicles Sold in Canada: Getting
Roadside Assistance
To fully assist you should you have a
vehicle concern, Ford Motor Company of
Canada, Limited offers a complimentary
roadside assistance program. This program
is eligible within Canada or the continental
United States.
The service is available 24 hours a day,
seven days a week.
This program is separate from the New
Vehicle Limited Warranty, but the coverage
is concurrent with the powertrain coverage
period of your vehicle. Canadian roadside
coverage and benefits may differ from the
U.S. coverage.
If you require more information, please call
us in Canada at 1-800-665-2006, or visit
our website at www.ford.ca.
HAZARD FLASHERS
Note:
The hazard flashers operate when
the ignition is in any position, or if the key is
not in the ignition. If used when the vehicle
is not running, the battery loses charge. As
a result, there may be insufficient power to
restart your vehicle.
The flasher control is on the
instrument panel. Use your
hazard flashers when your
vehicle is creating a safety hazard for other
motorists.
•
Press the flasher control and all front
and rear direction indicators flash.
•
Press the button again to switch them
off.
FUEL SHUTOFF
WARNING:
If your vehicle has been
involved in a crash, have the fuel system
checked. Failure to follow this instruction
could result in fire, personal injury or
death.
Note:
When you try to restart your vehicle
after a fuel shutoff, the vehicle makes sure
that various systems are safe to restart.
Once the vehicle determines the systems
are safe, then the vehicle allows you to
restart.
Note:
In the event that your vehicle does
not restart after your third attempt, contact
a qualified technician.
The fuel pump shutoff stops the flow of
fuel to the engine in the event of a
moderate to severe crash. Not every
impact causes a shutoff.
Should your vehicle shut off after a crash,
you may restart your vehicle.
If your vehicle has a key system:
1.
Switch off the ignition.
2. Switch to start position.
3. Switch off the ignition.
4. Switch on the ignition to re-enable the
fuel pump.
5. If the vehicle does not start, repeat
steps 1 through 4.
If your vehicle has a push button start
system:
1.
Press
START/STOP
to switch off your
vehicle.
2. Press the brake pedal and
START/STOP
to switch on your
vehicle.
3. Remove your foot from the brake pedal
and press
START/STOP
to switch off
your vehicle.
235
Roadside Emergencies
4. You can attempt to start the vehicle
by pressing the brake pedal and
START/STOP
, or press
START/STOP
without pressing the brake pedal.
5. If the vehicle does not start, repeat
steps 1 through 4.
JUMP STARTING THE VEHICLE
WARNING:
The gases around the
battery can explode if exposed to flames,
sparks, or lit cigarettes. An explosion
could result in personal injury or vehicle
damage.
WARNING:
Batteries contain
sulfuric acid which can burn skin, eyes
and clothing, if contacted.
WARNING:
Use only an
adequate-sized cable with insulated
clamps.
Preparing Your Vehicle
Note:
Do not attempt to push-start your
automatic transmission vehicle. Automatic
transmissions do not have push-start
capability. Attempting to push-start a
vehicle with an automatic transmission may
cause transmission damage.
Note:
Use only a 12-volt supply to start your
vehicle.
Note:
Do not disconnect the battery of the
disabled vehicle as this could damage the
vehicle's electrical system.
Park the booster vehicle close to the hood
of the disabled vehicle, making sure the
two vehicles do not touch. Turn all
accessories off.
Connecting the Jumper Cables
WARNING:
Do not attach the
cables to fuel lines, engine rocker covers,
the intake manifold or electrical
components as grounding points. Stay
clear of moving parts. To avoid reverse
polarity connections, make sure that you
correctly identify the positive (+) and
negative (-) terminals on both the
disabled and booster vehicles before
connecting the cables. Battery positions
may vary.
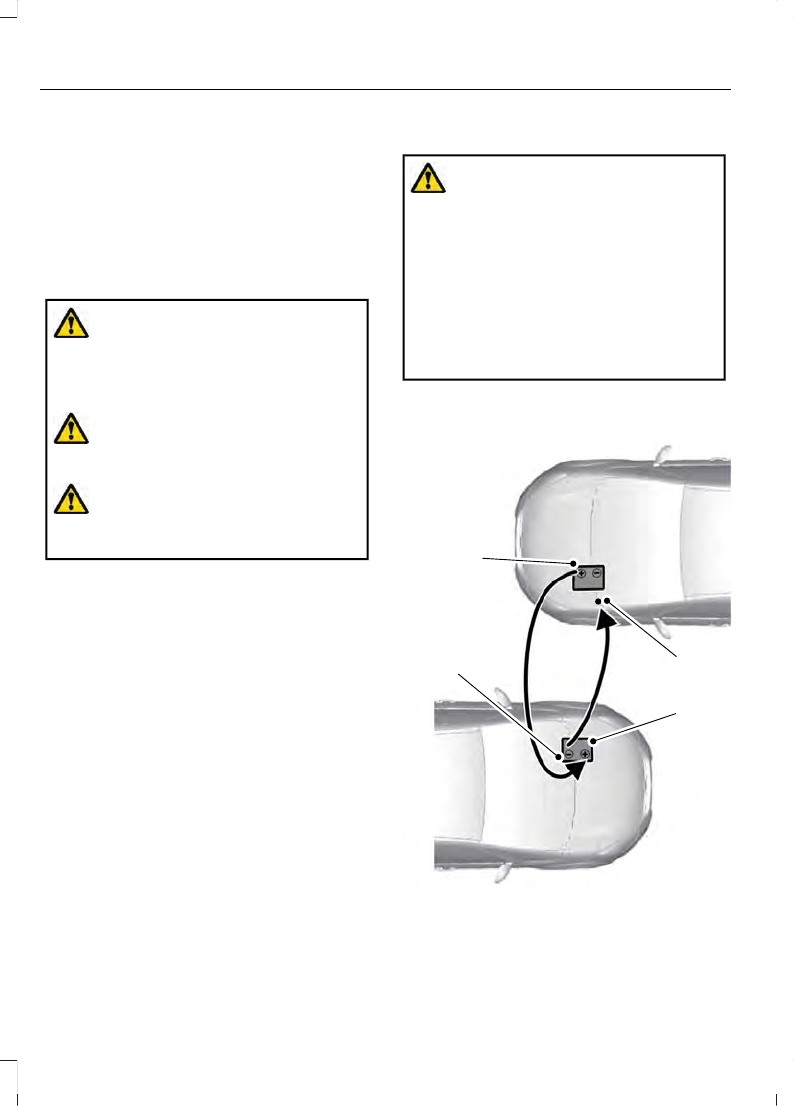
Note:
In the illustration, the bottom vehicle
represents the booster vehicle.
4
2
1
3
E142664
1.
Connect the positive (+) jumper cable
to the positive (+) terminal of the
discharged battery.
236
Roadside Emergencies
2. Connect the other end of the positive
(+) cable to the positive (+) terminal
of the assisting battery.
3. Connect the negative (-) cable to the
negative (-) terminal of the assisting
battery.
E152134
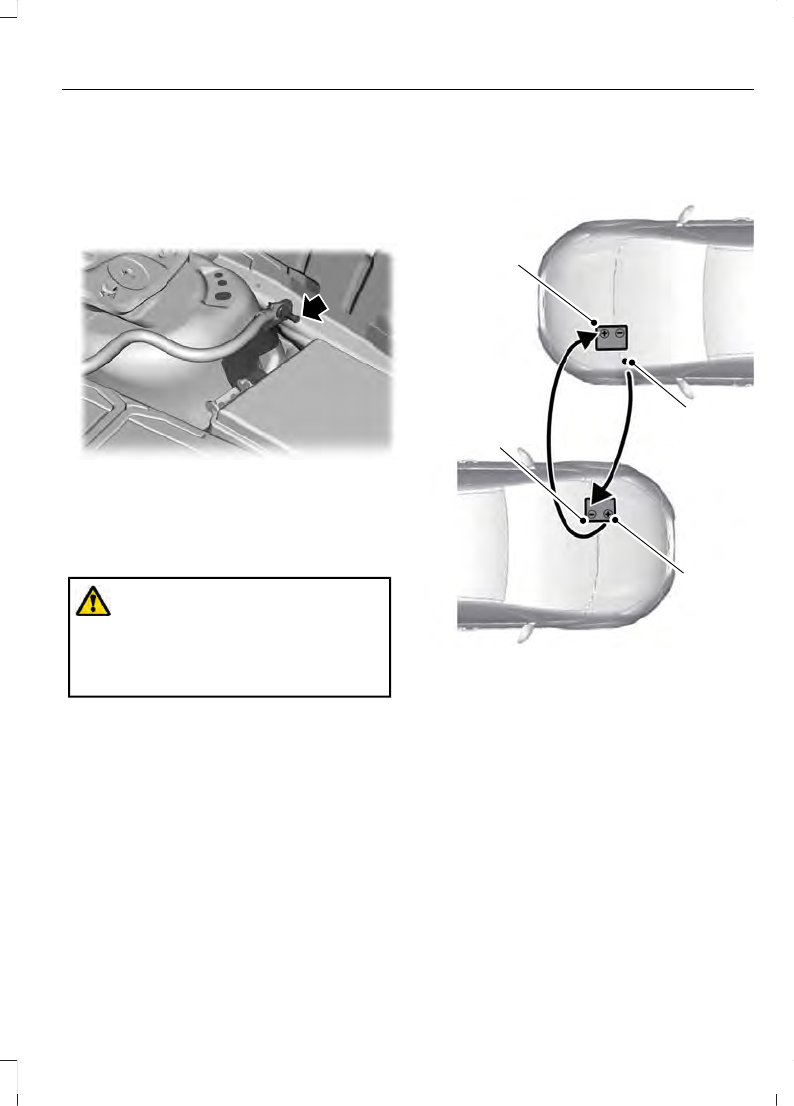
4. Make the final connection of the
negative (-) cable to an exposed metal
part of the stalled vehicle's engine, or
connect the negative (-) cable to the
ground connection point, if available.
WARNING:
Do not connect the end
of the second cable to the negative (-)
terminal of the battery to be jumped. A
spark may cause an explosion of the
gases that surround the battery.
Jump Starting
1.
Start the engine of the booster vehicle
and rev the engine moderately, or press
the accelerator gently to keep your
engine speed between 2000 and 3000
rpms, as shown in your tachometer.
2. Start the engine of the disabled vehicle.
3. After starting the disabled vehicle, run
both vehicle engines for an additional
three minutes before disconnecting the
jumper cables.
Removing the Jumper Cables
Remove the jumper cables in the reverse
order that they were connected.
4
1
3
2
E142665
1.
Remove the jumper cable from the
ground metal surface or connecting
point, if available.
2. Remove the jumper cable on the
negative (-) terminal of the booster
vehicle's battery.
3. Remove the jumper cable from the
positive (+) terminal of the booster
vehicle's battery.
4. Remove the jumper cable from the
positive (+) terminal of the disabled
vehicle's battery.
After starting your disabled vehicle and
removing the jumper cables, allow your
vehicle to idle for several minutes so the
battery can recharge.
237
Roadside Emergencies
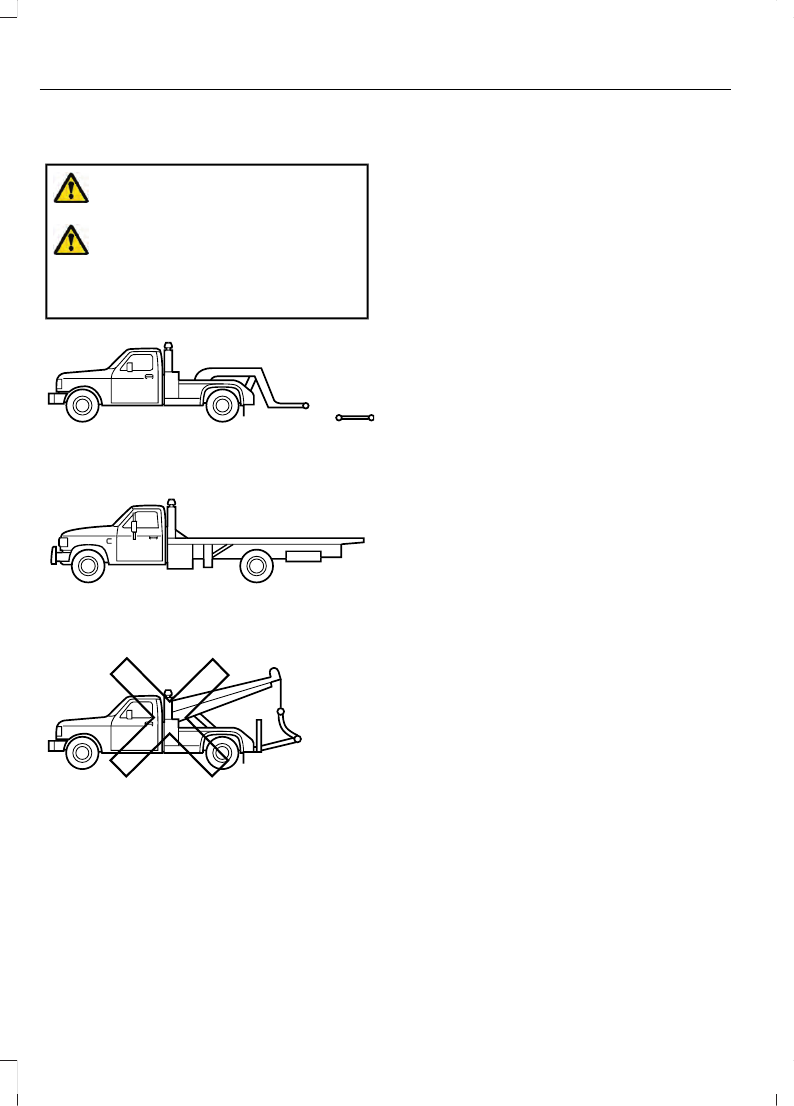
TRANSPORTING THE VEHICLE
WARNING:
Block the wheels to
help prevent the vehicle from moving.
WARNING:
Unexpected and
possibly sudden vehicle movement may
occur if you do not take these
precautions.
E143886
If you need to tow your vehicle, contact a
professional towing service or, if you are a
member of a roadside assistance program,
your roadside assistance service provider.
We recommend the use of a wheel lift and
dollies or flatbed equipment to tow your
vehicle. Do not tow with a slingbelt. We do
not approve a slingbelt towing procedure.
If you tow your vehicle incorrectly, or by
any other means, vehicle damage may
occur.
We produce a towing manual for all
authorized tow truck operators. Have your
tow truck operator refer to this manual for
proper hook-up and towing procedures for
your vehicle.
It is acceptable to have your two-wheel
drive vehicle towed with the front wheels
on the ground (without dollies) and the
rear wheels off the ground.
We recommend towing a four-wheel drive
vehicle with all wheels off the ground, such
as using a wheel lift and dollies or flatbed
equipment. However, it is acceptable to
use a wheel lift to raise the rear of your
vehicle so long as, depending on vehicle
configuration, you perform the following
before towing:
•
If your vehicle has an electronic
shift-on-the-fly transfer case, make
sure you switch the four-wheel drive
control to the
2H
position before
towing.
Note:
Towing an electronic shift-on-the-fly
four-wheel drive vehicle with the front
wheels on the ground without disengaging
the front hubs may cause damage to the
automatic transmission.
Note:
Towing a two-wheel drive vehicle or
an electronic shift-on-the-fly four-wheel
drive vehicle with the rear wheels on the
ground for more than 50 mi (80 km) or
faster than 35 mph (56 km/h) may cause
damage to the automatic transmission.
TOWING POINTS
Note:
Some towing points may not be on
your vehicle.
238
Roadside Emergencies
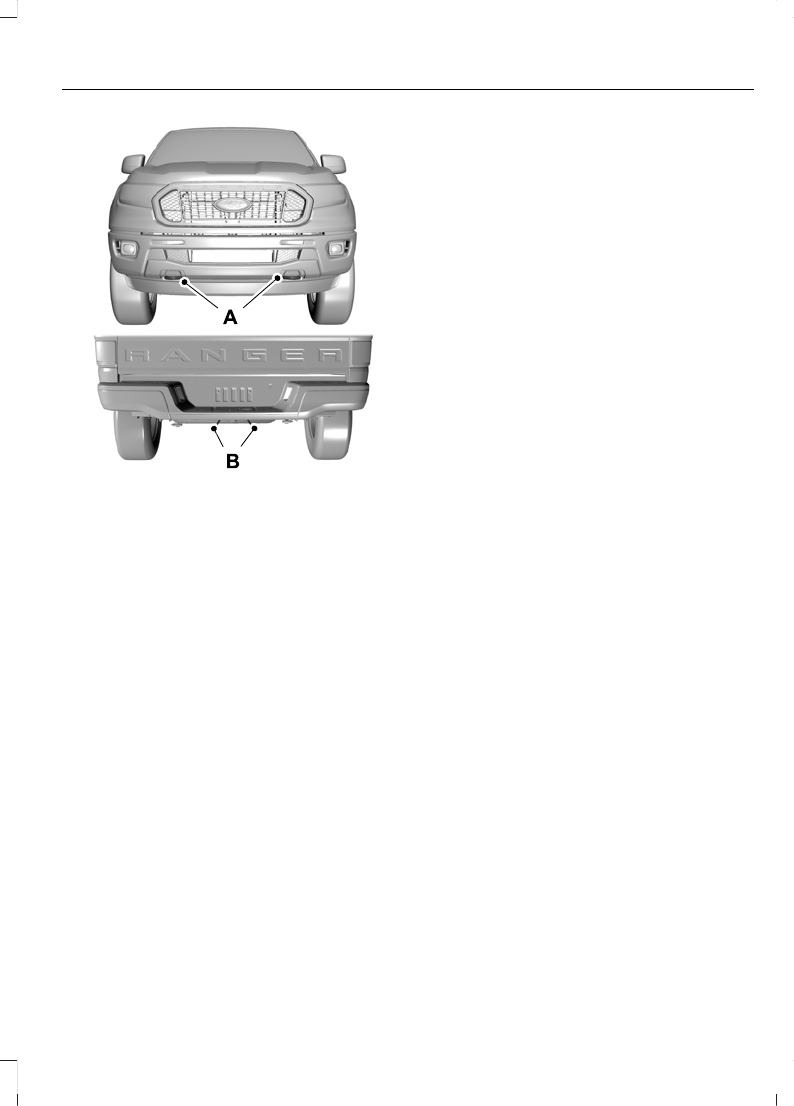
E277284
Front towing eyes.
A
Rear safety chain loop.
B
Your vehicle comes with frame-mounted
front recovery hooks. These hooks should
never have a load applied to them greater
than the gross vehicle weight rating of your
vehicle.
Before using recovery hooks:
•
Make sure all attaching points are
secure and capable of withstanding
the applied load.
•
Never use chains, cables or tow straps
with metal hook ends.
•
Only use recovery straps that have a
minimum breaking strength two to
three times the gross vehicle weight of
the stuck vehicle.
•
Make sure the recovery strap is in good
condition and free of visible cuts, tears
or damage.
•
Use a damper device such as a tarp,
heavy blanket or piece of carpet
draped over the recovery strap to help
absorb the energy in the event the
strap breaks.
•
Make sure the stuck vehicle is not
loaded heavier than its gross vehicle
weight rating specified on the
certification label.
•
Always align the tow vehicle and stuck
vehicle in a straight line (within 10
degrees).
•
Keep bystanders to the
sides
of the
vehicle, at a distance of at least twice
the length of the recovery strap. This
helps avoid injury from the hazard of a
recovery hook or strap breaking, or a
vehicle lurching into their path.
239
Roadside Emergencies
")


